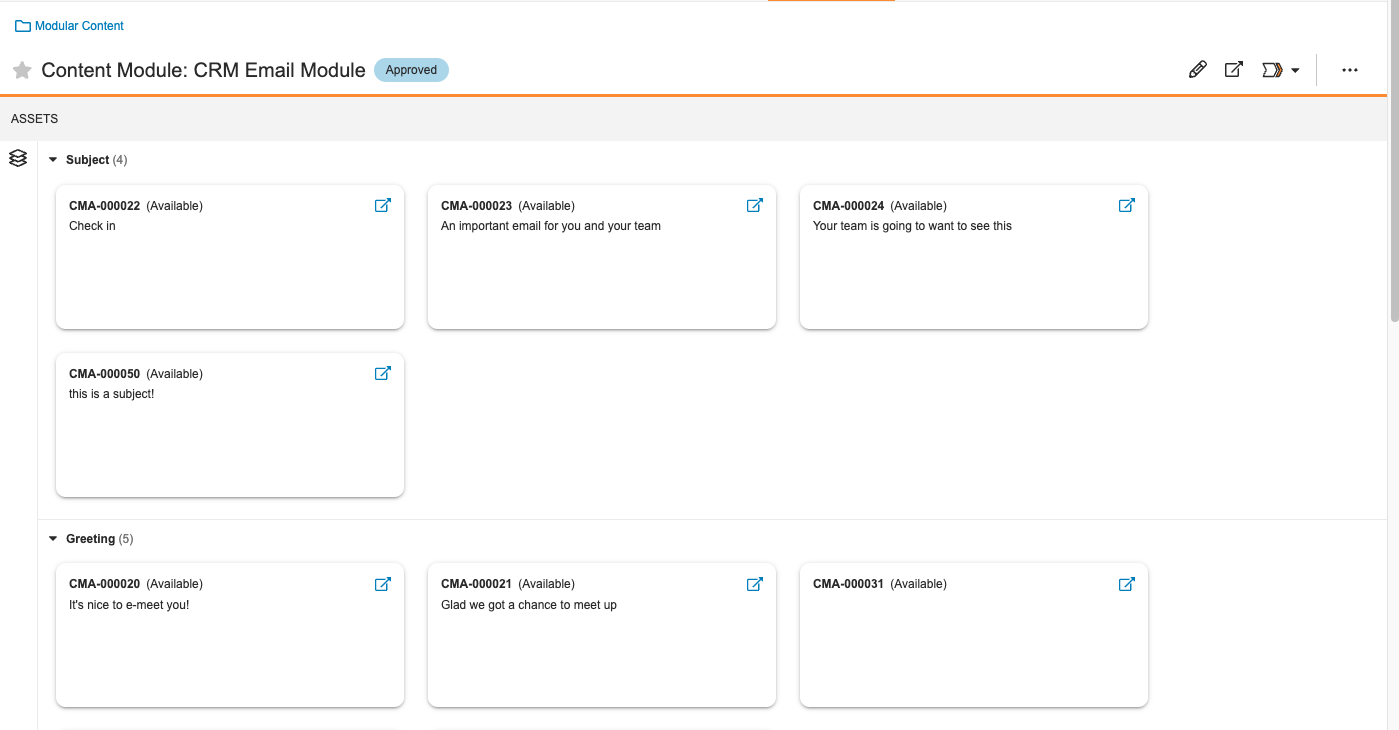
 To compose and send an email using the Email Builder, the documents, fragments, and cells must be in their steady state.
## Configuring the Content Module Lifecycle
Before configuring _CRM Emails_, you must configure the _Complete State_ type
for the _Content Module Lifecycle_:
1. Navigate to **Admin > Configuration > Object Lifecycles**.
2. Click **Content Module Lifecycle**.
3. Under _State Types_, click **Complete State**.
4. Click **Edit**.
5. Select a **State** to associate with the _Complete State_.
6. Click **Save**.
## Defining Content Cells
The Email Builder includes the following columns:
* **Subject**: The email _Subject_
* **Greeting**: The email _Greeting_
* **Paragraph 1**: The first paragraph of the email
* **Paragraph 2**: The second paragraph of the email
* **Documents**: _Email Fragments_ included in the email
* **Paragraph 3**: The third paragraph of the email
* **Closing**: The closing remarks
To compose and send an email using the Email Builder, the documents, fragments, and cells must be in their steady state.
## Configuring the Content Module Lifecycle
Before configuring _CRM Emails_, you must configure the _Complete State_ type
for the _Content Module Lifecycle_:
1. Navigate to **Admin > Configuration > Object Lifecycles**.
2. Click **Content Module Lifecycle**.
3. Under _State Types_, click **Complete State**.
4. Click **Edit**.
5. Select a **State** to associate with the _Complete State_.
6. Click **Save**.
## Defining Content Cells
The Email Builder includes the following columns:
* **Subject**: The email _Subject_
* **Greeting**: The email _Greeting_
* **Paragraph 1**: The first paragraph of the email
* **Paragraph 2**: The second paragraph of the email
* **Documents**: _Email Fragments_ included in the email
* **Paragraph 3**: The third paragraph of the email
* **Closing**: The closing remarks
Note: While you can choose to remove columns, you cannot change the column order.
 ## Updating Email Templates
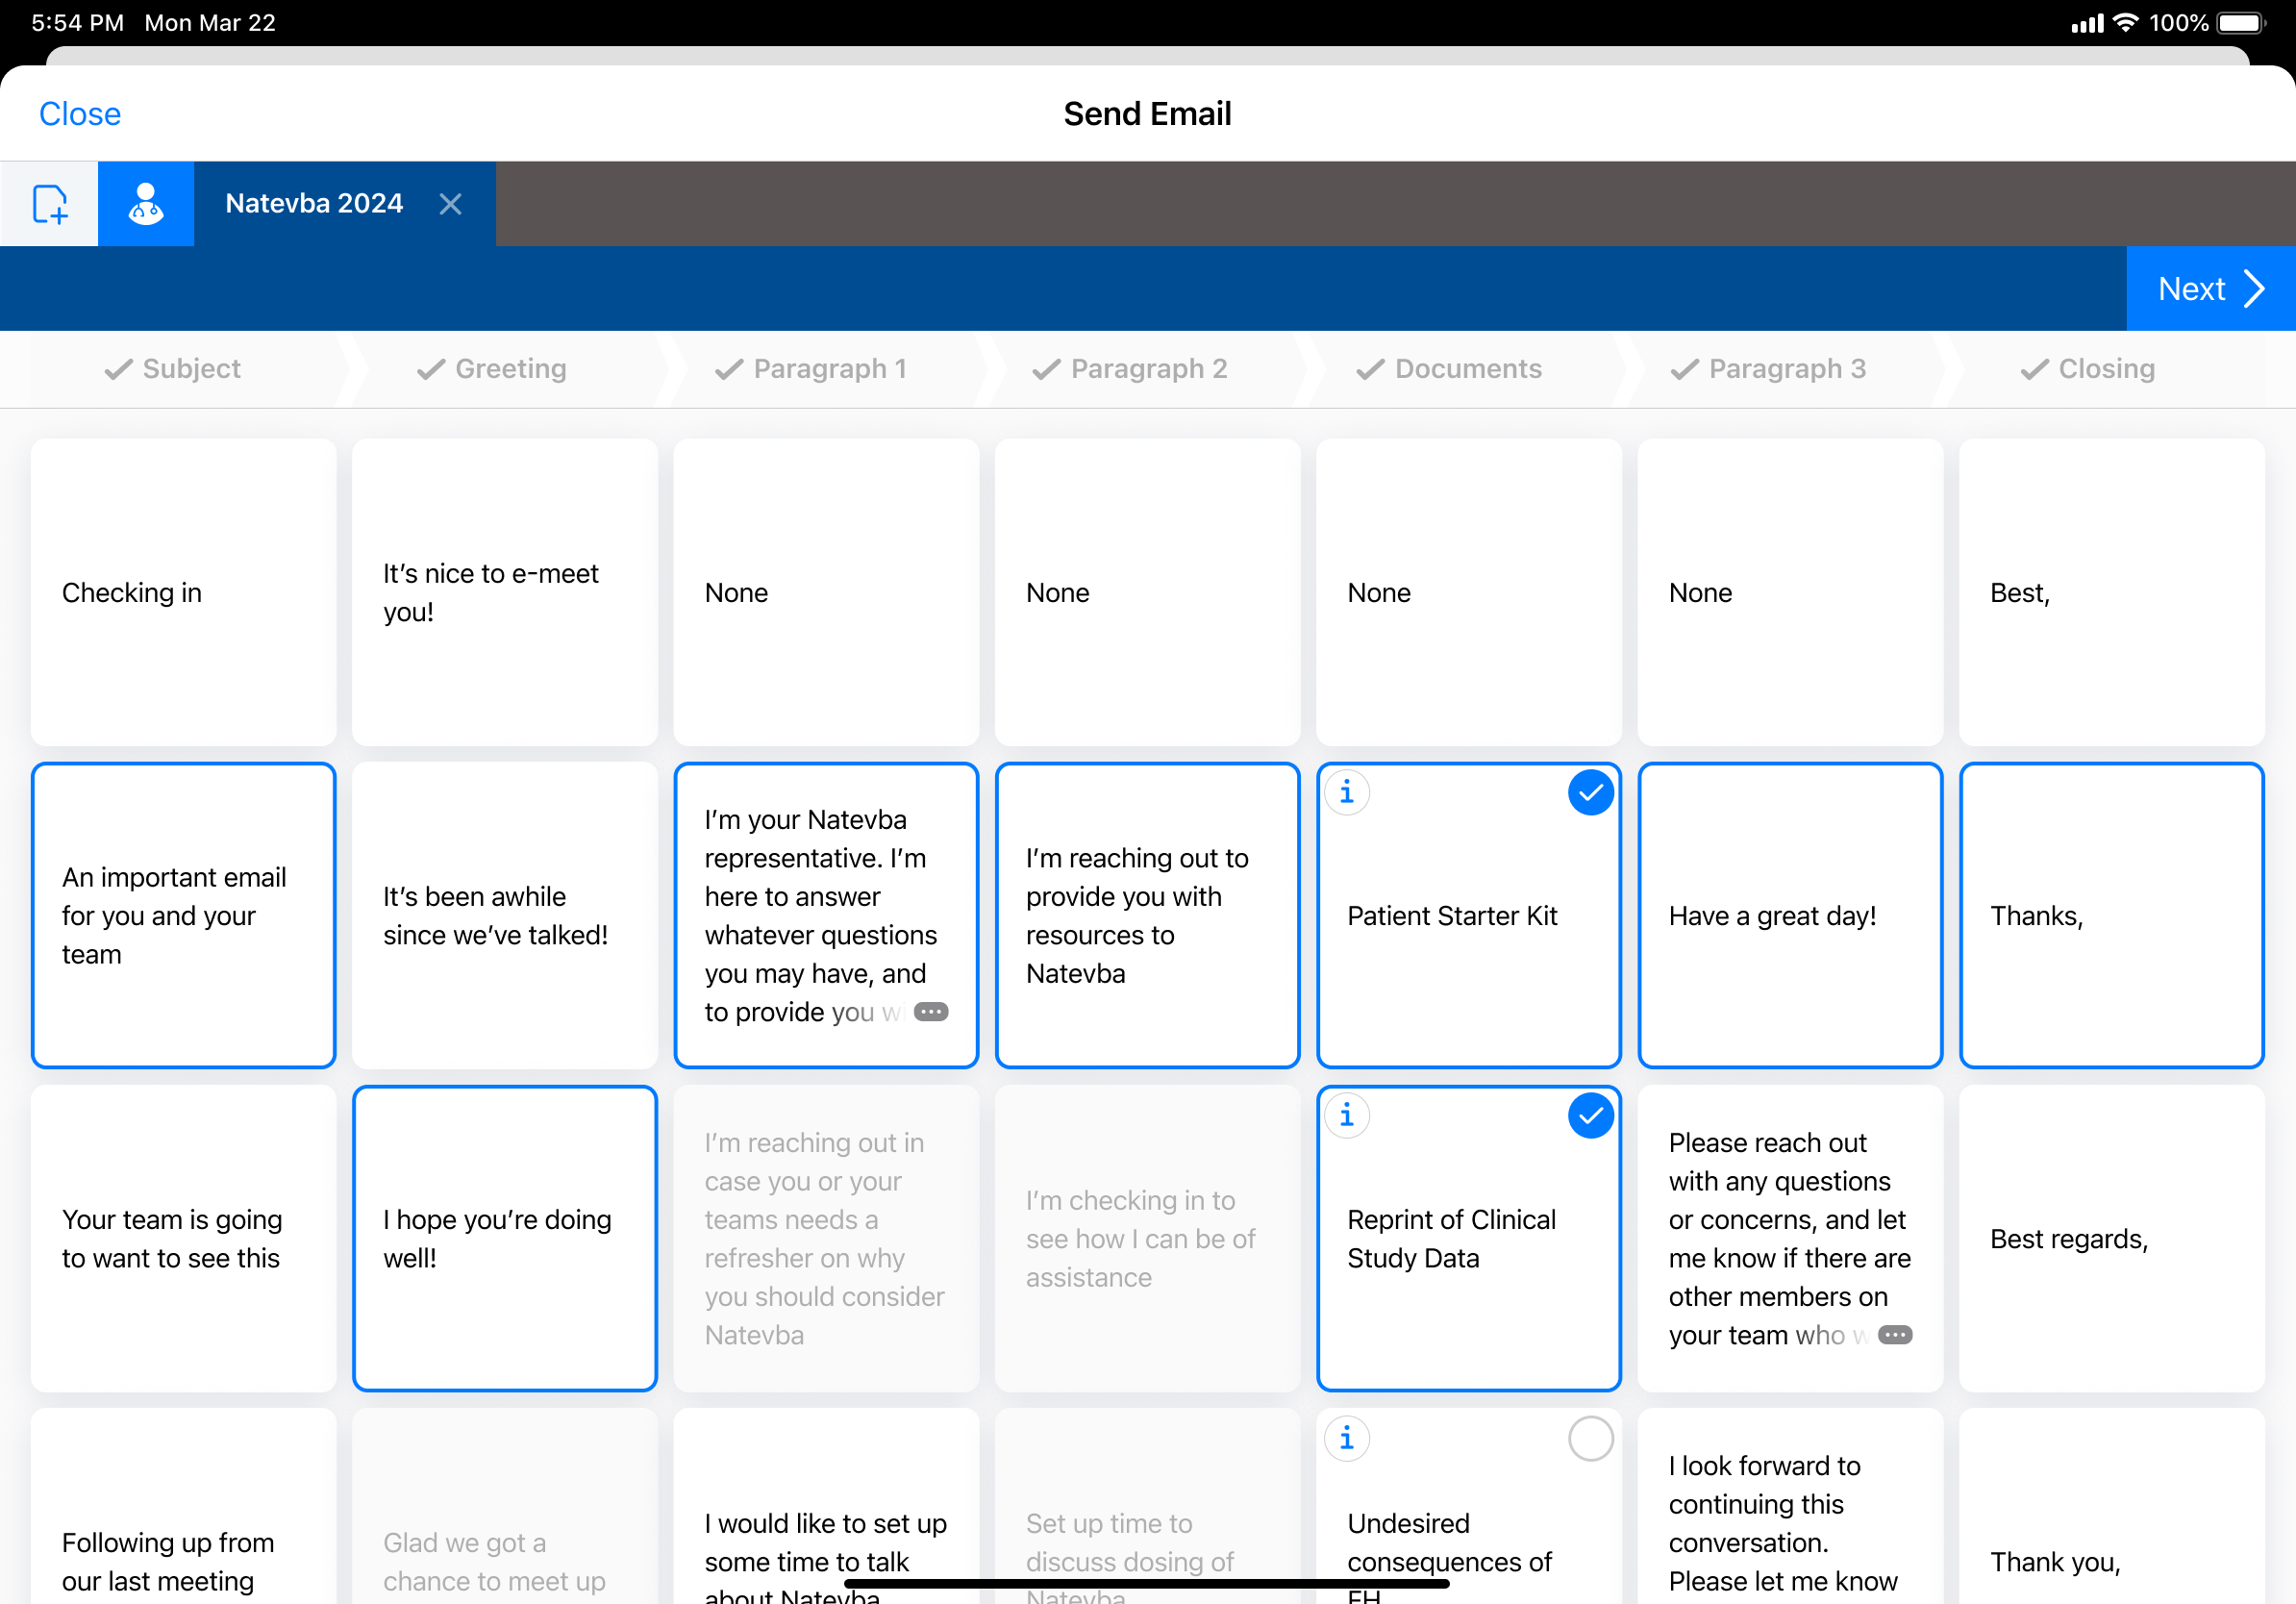
You must associate the Email Builder with an email template. You can use one Email Builder with multiple email templates; however, each email template can only be associated with one Email Builder. Email templates with an Email Builder are not supported in Recommended Emails, Suggestions, and Events Management.
To associate the Email Builder with an email template, you must add the _Content Module_ field to the _Email Template_ document type
, and inside the _Email Template_, you must assign the associated _CRM Email_ module with the field.
You can define where Email Builder content displays in an email template by inserting the `{{insertEmailBuilder}}` token into an empty `Table` tag. To insert the tag in BEE Editor, select **Merge Tags** and then select **Insert Email Builder**.
You can also define the Email Builder styling by modifying the `Table` tag styles. The defined styles are inherited by the content cells inserted in the table tag. Each inserted row is assigned an _ID_ attribute, so you can optionally customize them by adding CSS in the _Email Template_ and applying the styling via the _ID_ attribute.
The _IDs_ for each row are defined in the table below. The CSS Example column contains examples of how each row can be styled.
## Updating Email Templates
You must associate the Email Builder with an email template. You can use one Email Builder with multiple email templates; however, each email template can only be associated with one Email Builder. Email templates with an Email Builder are not supported in Recommended Emails, Suggestions, and Events Management.
To associate the Email Builder with an email template, you must add the _Content Module_ field to the _Email Template_ document type
, and inside the _Email Template_, you must assign the associated _CRM Email_ module with the field.
You can define where Email Builder content displays in an email template by inserting the `{{insertEmailBuilder}}` token into an empty `Table` tag. To insert the tag in BEE Editor, select **Merge Tags** and then select **Insert Email Builder**.
You can also define the Email Builder styling by modifying the `Table` tag styles. The defined styles are inherited by the content cells inserted in the table tag. Each inserted row is assigned an _ID_ attribute, so you can optionally customize them by adding CSS in the _Email Template_ and applying the styling via the _ID_ attribute.
The _IDs_ for each row are defined in the table below. The CSS Example column contains examples of how each row can be styled.
| Row | ID | CSS Example |
|---|---|---|
| Greeting | `ae-greeting` |
|
| Paragraph 1 | `ae-paragraph1` |
|
| Paragraph 2 | `ae-paragraph2` |
|
| Document | `ae-document` |
|
| Paragraph 3 | `ae-paragraph3` |
|
| Closing | `ae-closing` |
|
 ## Creating CRM Email & Email Asset Records
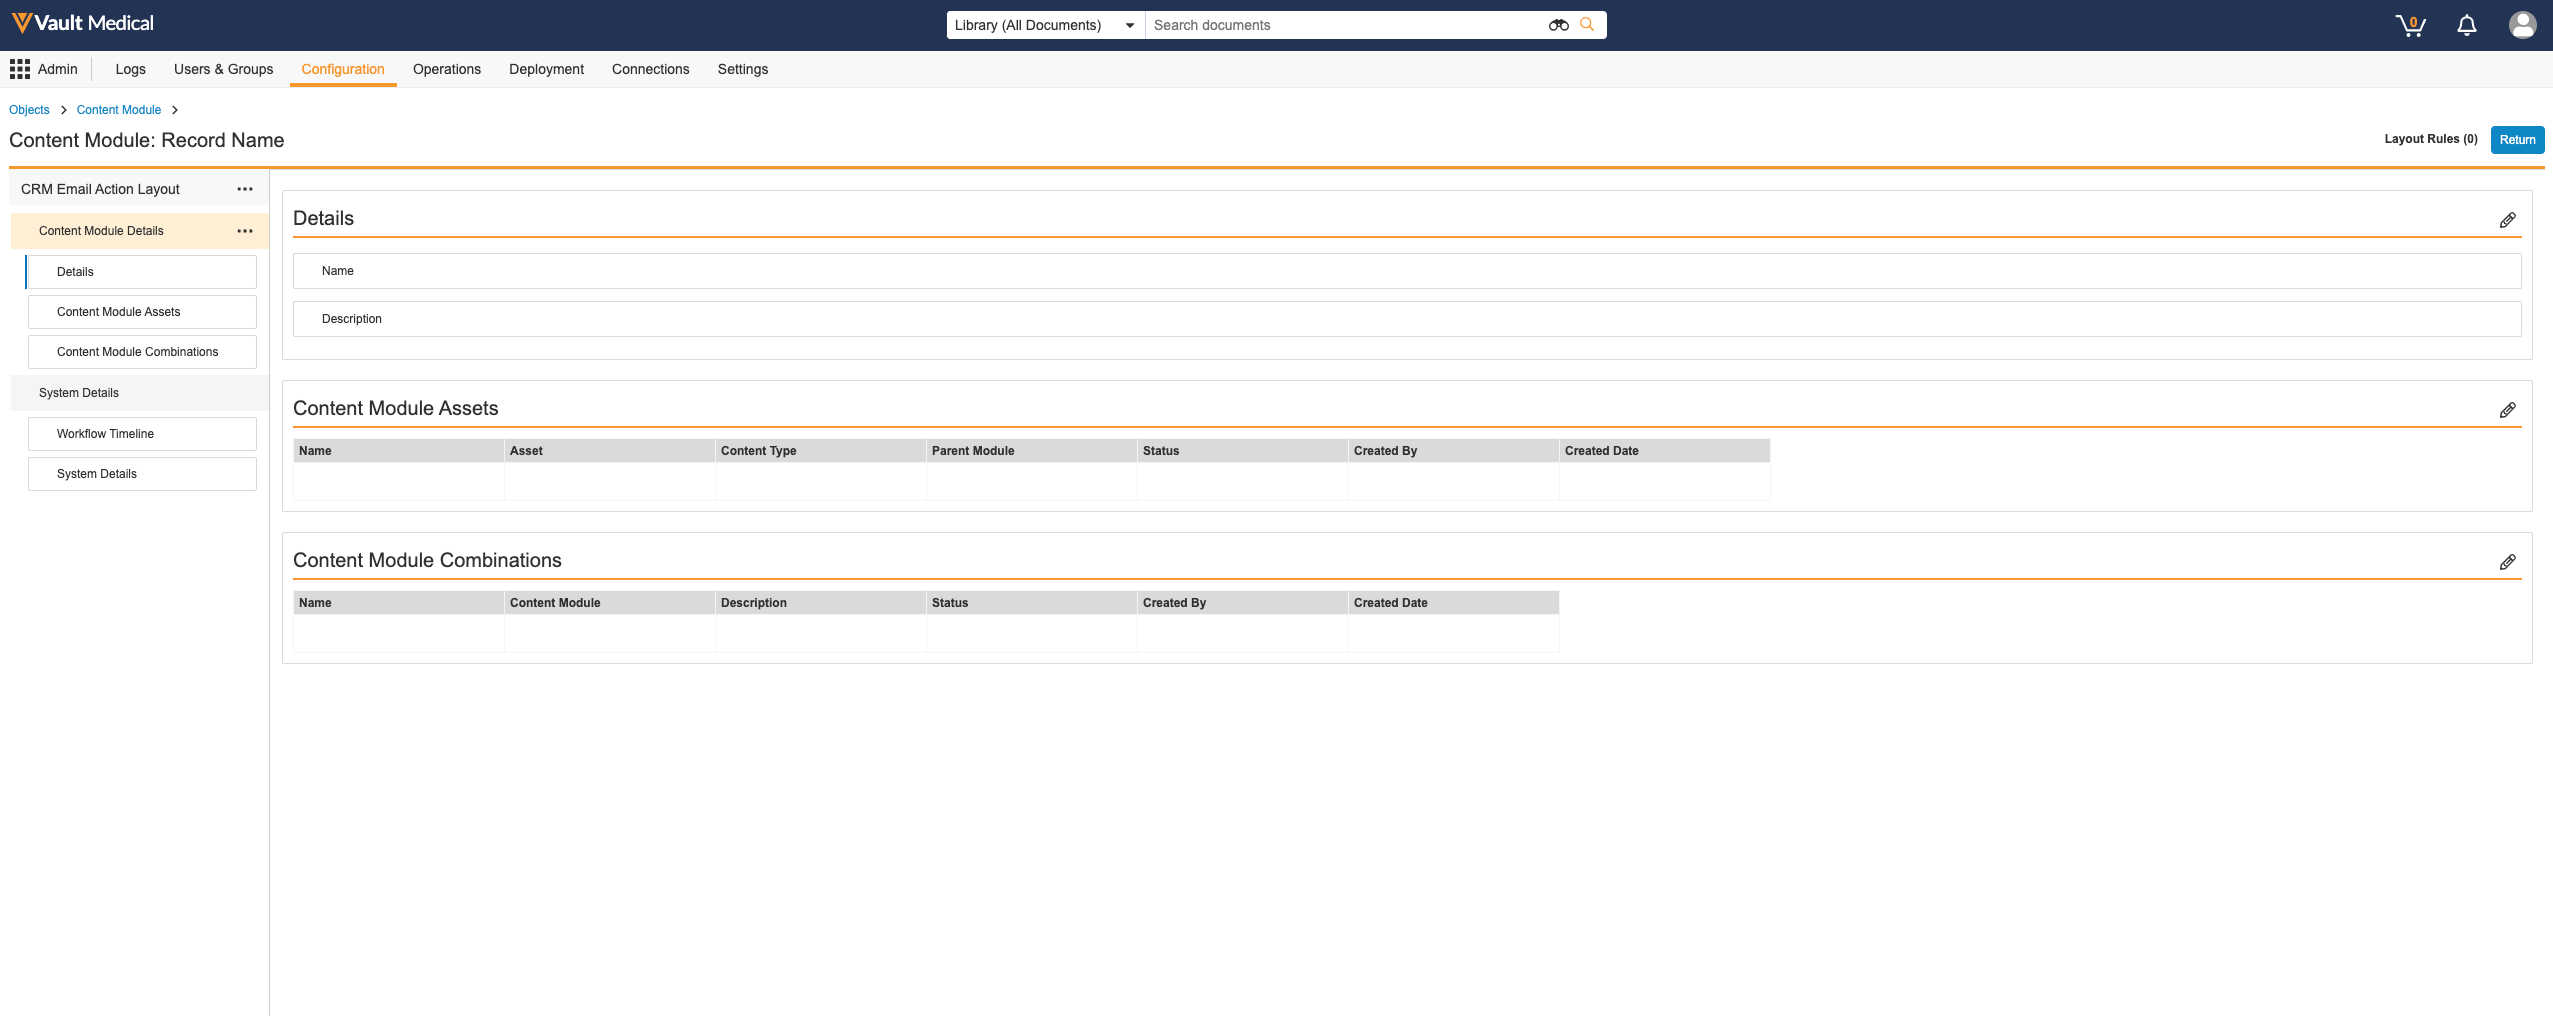
To create _CRM Email_ records:
1. Navigate to the **Modular Content** tab or to **Business Admin > Objects > Content Modules**.
2. Click **Create**.
3. If your Vault uses multiple _Content Module_ object types, select **CRM Email** in the _Content Module Type_ drop-down.
4. Select a **Primary Country**.
5. Enter a **Description**. The _Description_ cannot exceed 5000 characters. Click to expand the field.
6. Select a **Primary Product**.
7. Click **Save**, or click **Save + Continue** to create another _CRM Email_ record.
To create _Email Asset_ records:
1. Open a _CRM Email_ module.
2. Click to edit the module.
3. Click **+ Email Asset** to add the relevant _Content_ field. You can select the appropriate _Content Type_ in the dialog, but the text cannot exceed 5,000 characters. Click to expand the field.
4. To remove an asset, click the **X** icon.
5. To reorder assets, drag and drop the cards.
6. When finished adding assets, click **Save**.
As with other _Content Module_ object types, you can add a maximum of 100 _Email Assets_ per _Content Module_ by default. You can contact Veeva Product Support to raise this limit.
## Creating CRM Email Combinations
Content creators can define _Combination_ records to specify which content cells can be selected, and when. Users can select from all content cells in the _Combination_ when composing an email.
To create a _Combination_ for a _CRM Email_ module:
1. Open a _CRM Email_ module.
2. Click next to _Combinations_ in the left navigation panel.
3. Enter a **Description**.
4. Click **Continue**.
Once you create the _Combination_ record, you can begin adding _Assets_. By default, Vault selects all assets for inclusion. To manually select assets, clear the **Selected** checkbox and select any applicable assets. Click **Save** to finish editing the _Combination_. Vault creates _Combinations_ in the _Pending_ state.
You can view _Combinations_ by selecting from the list in the left navigation panel. While viewing a _Combination_, you can click to edit the _Combination_ or to delete the record.
To open non- _Pending_ state _Combination_ records in a mini-browser window, click . From there, you can edit the record and move the _Combination_ through the _Content Module Combinations Lifecycle_.
## Configuring CRM Email Previews
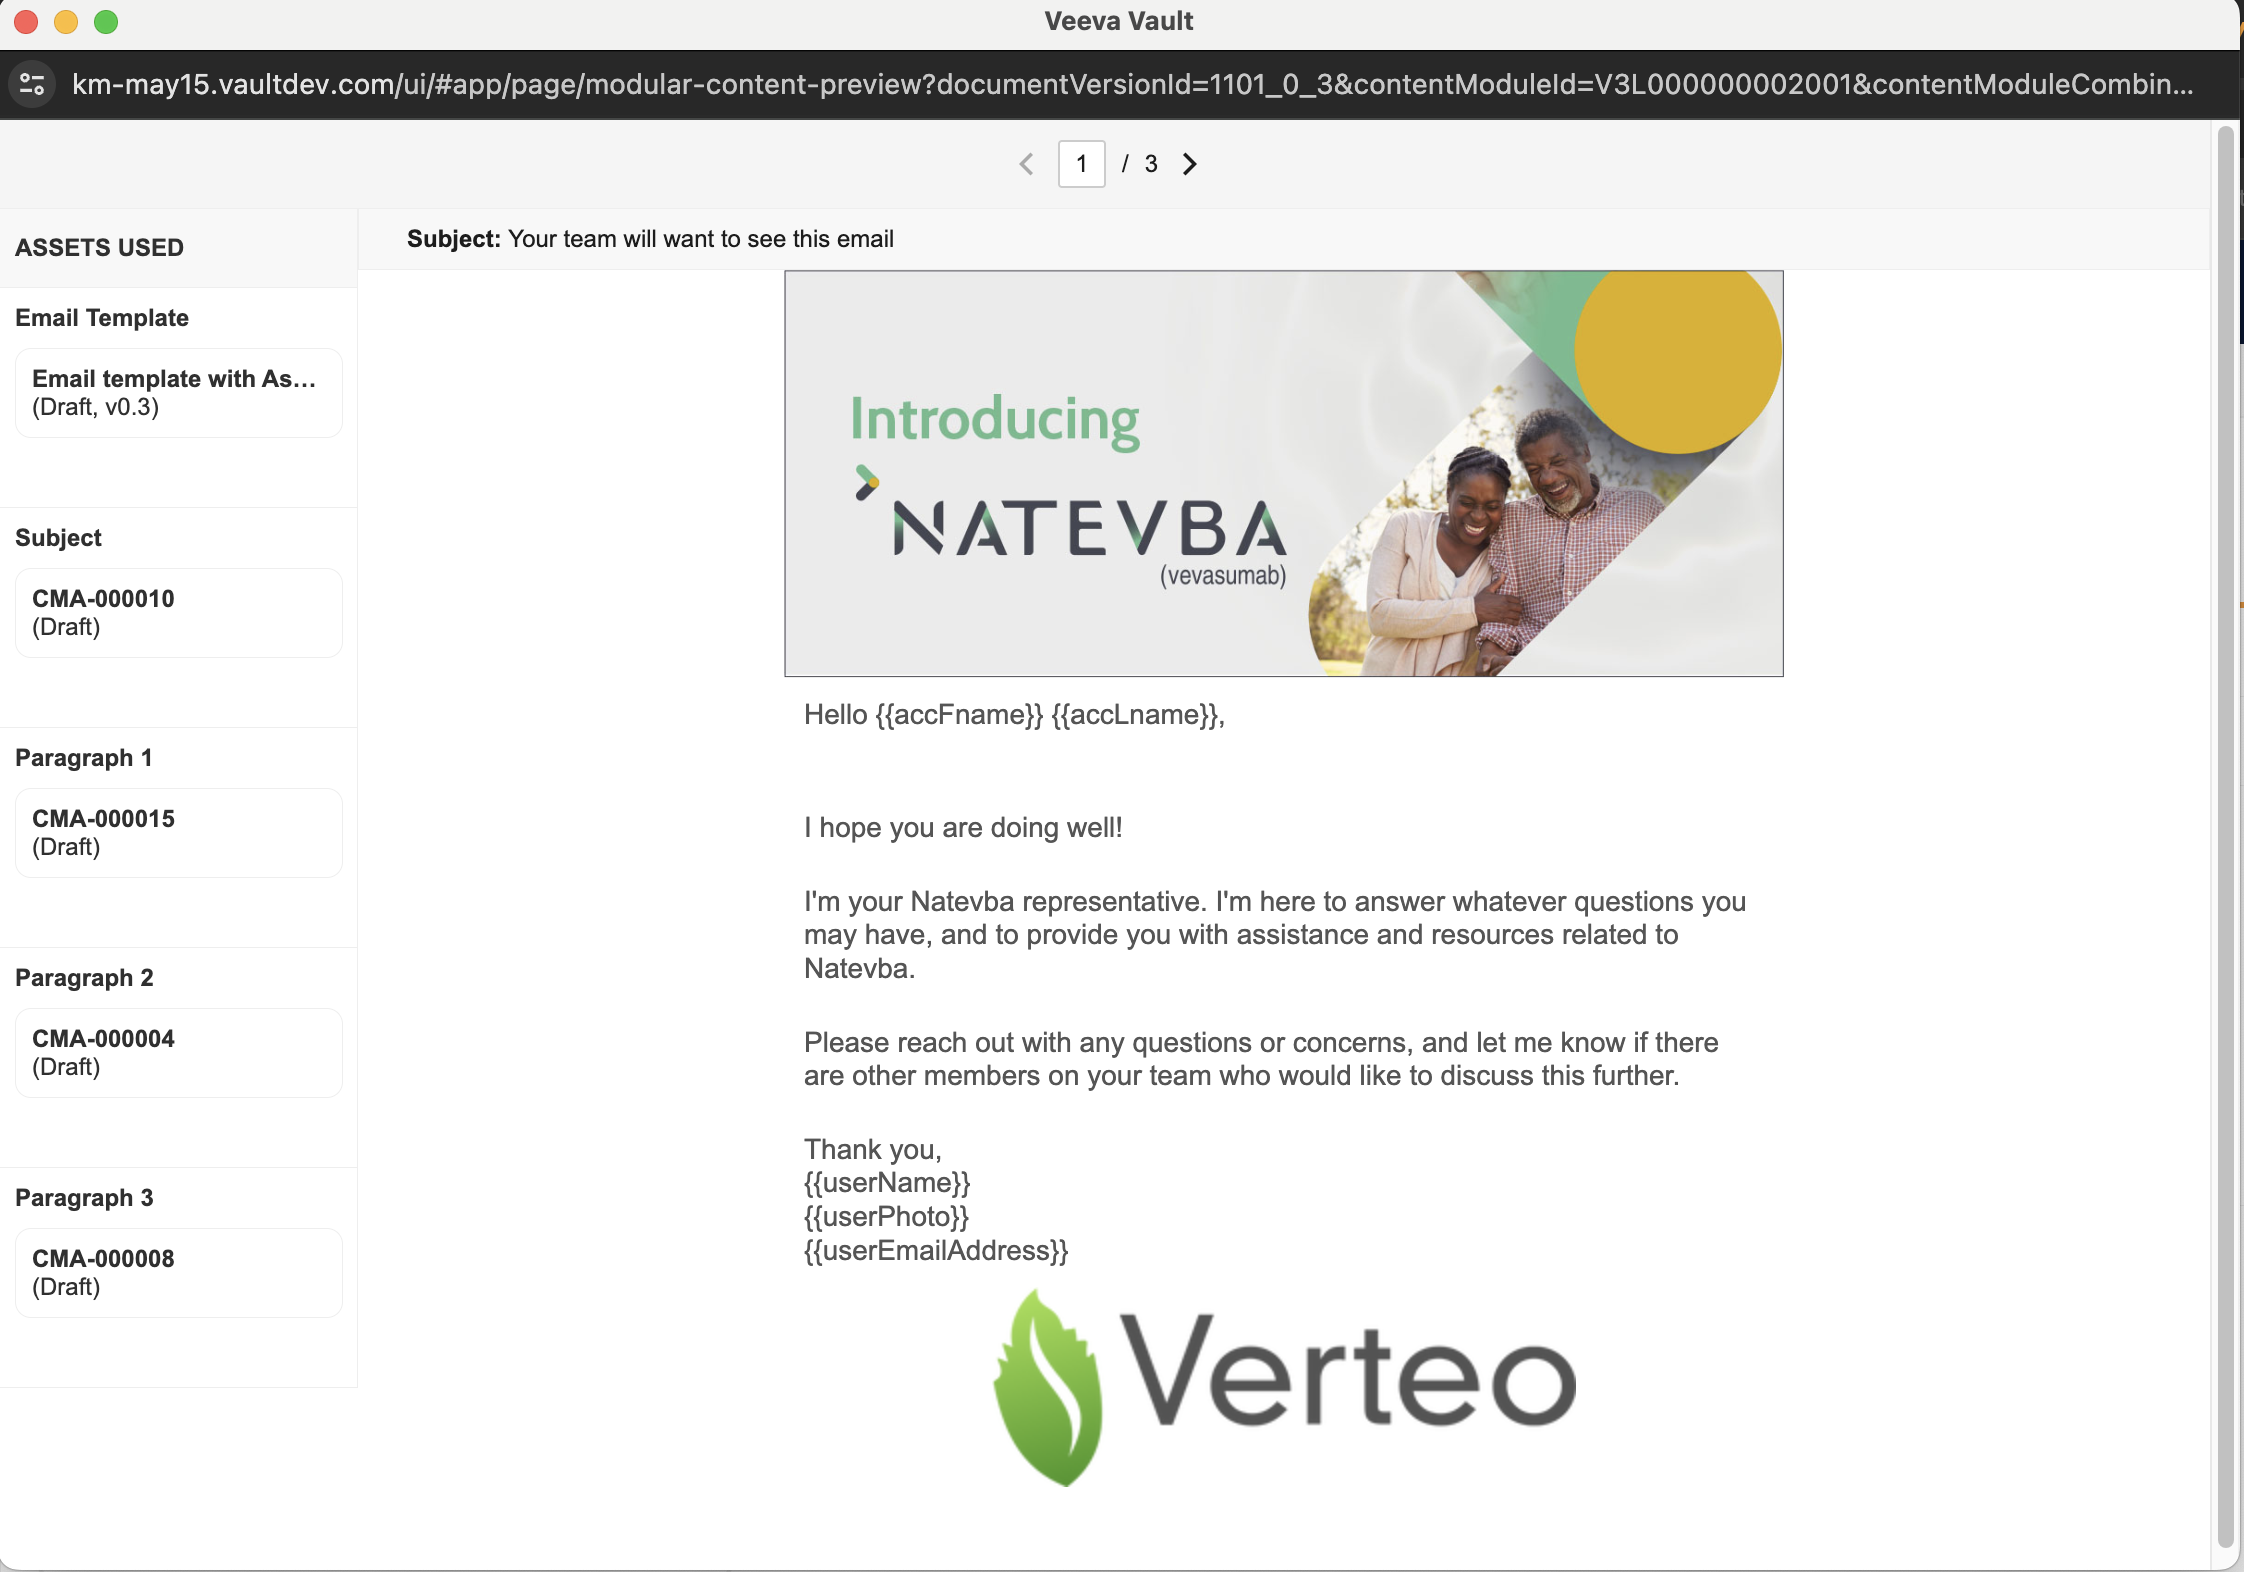
When configured, you can perform the **Generate Preview** action, allowing you to generate HTML previews for _CRM Email_ modules in PromoMats by combining a _CRM Email_ module and an _Email Template_.
The _Generate Preview_ action is available on all states of the _Content Module_ object lifecycle. By default, Atomic Security
allows all Vault users to execute this action. You can perform this action from the _CRM Email_ module record in **Business Admin** or the the **Modular Content** tab by clicking the **Actions** menu.
Vault displays a notification when the preview link is ready. Vault generates a maximum of 20 previews per _CRM Email_ module. Previews are user-specific and cannot be shared. Previews are valid for 24 hours. You can also click **Show Preview** to reopen the preview if the previously-generated preview is still valid.
When generating a preview, you must first select an _Email Template_. Vault displays available templates based on the following conditions:
* The _Content Module_ (`content_module__v`) document field includes the record _ID_ of the _Content Module_ you are attempting to preview
* The _Document Type_ is _Email Template_ (`email_template__v`)
* The _Email Template_ document is in the _Draft_, _Staged_, or _Approved_ state
## Creating CRM Email & Email Asset Records
To create _CRM Email_ records:
1. Navigate to the **Modular Content** tab or to **Business Admin > Objects > Content Modules**.
2. Click **Create**.
3. If your Vault uses multiple _Content Module_ object types, select **CRM Email** in the _Content Module Type_ drop-down.
4. Select a **Primary Country**.
5. Enter a **Description**. The _Description_ cannot exceed 5000 characters. Click to expand the field.
6. Select a **Primary Product**.
7. Click **Save**, or click **Save + Continue** to create another _CRM Email_ record.
To create _Email Asset_ records:
1. Open a _CRM Email_ module.
2. Click to edit the module.
3. Click **+ Email Asset** to add the relevant _Content_ field. You can select the appropriate _Content Type_ in the dialog, but the text cannot exceed 5,000 characters. Click to expand the field.
4. To remove an asset, click the **X** icon.
5. To reorder assets, drag and drop the cards.
6. When finished adding assets, click **Save**.
As with other _Content Module_ object types, you can add a maximum of 100 _Email Assets_ per _Content Module_ by default. You can contact Veeva Product Support to raise this limit.
## Creating CRM Email Combinations
Content creators can define _Combination_ records to specify which content cells can be selected, and when. Users can select from all content cells in the _Combination_ when composing an email.
To create a _Combination_ for a _CRM Email_ module:
1. Open a _CRM Email_ module.
2. Click next to _Combinations_ in the left navigation panel.
3. Enter a **Description**.
4. Click **Continue**.
Once you create the _Combination_ record, you can begin adding _Assets_. By default, Vault selects all assets for inclusion. To manually select assets, clear the **Selected** checkbox and select any applicable assets. Click **Save** to finish editing the _Combination_. Vault creates _Combinations_ in the _Pending_ state.
You can view _Combinations_ by selecting from the list in the left navigation panel. While viewing a _Combination_, you can click to edit the _Combination_ or to delete the record.
To open non- _Pending_ state _Combination_ records in a mini-browser window, click . From there, you can edit the record and move the _Combination_ through the _Content Module Combinations Lifecycle_.
## Configuring CRM Email Previews
When configured, you can perform the **Generate Preview** action, allowing you to generate HTML previews for _CRM Email_ modules in PromoMats by combining a _CRM Email_ module and an _Email Template_.
The _Generate Preview_ action is available on all states of the _Content Module_ object lifecycle. By default, Atomic Security
allows all Vault users to execute this action. You can perform this action from the _CRM Email_ module record in **Business Admin** or the the **Modular Content** tab by clicking the **Actions** menu.
Vault displays a notification when the preview link is ready. Vault generates a maximum of 20 previews per _CRM Email_ module. Previews are user-specific and cannot be shared. Previews are valid for 24 hours. You can also click **Show Preview** to reopen the preview if the previously-generated preview is still valid.
When generating a preview, you must first select an _Email Template_. Vault displays available templates based on the following conditions:
* The _Content Module_ (`content_module__v`) document field includes the record _ID_ of the _Content Module_ you are attempting to preview
* The _Document Type_ is _Email Template_ (`email_template__v`)
* The _Email Template_ document is in the _Draft_, _Staged_, or _Approved_ state
Note: Any CSS added to the Email Template to style each inserted row are not currently rendered in the preview; however, they are rendered in the final email constructed by the Email Builder.
 ### Generating Content Module Combination Previews
If your Vault contains active _Content Module Combination_ records on the _Content Module_, Vault only generates previews of the _Combinations_ defined, rather than allowing previews at the _Content Module_ level.
In Veeva CRM, _Content Module Combinations_ specify rules.
### Generating Content Module Combination Previews
If your Vault contains active _Content Module Combination_ records on the _Content Module_, Vault only generates previews of the _Combinations_ defined, rather than allowing previews at the _Content Module_ level.
In Veeva CRM, _Content Module Combinations_ specify rules.
Note: If your Vault contains active Content Module Combinations, Vault does not display the Generate Preview button on an individual Content Module. The Generate Preview button is only displayed on a Content Module Combination.
Note: Content Module Combinations cannot currently be copied when copying a Content Module. Combinations must be manually rebuilt in the copied Content Module afterwards.