# Configuring Quick Check Agent
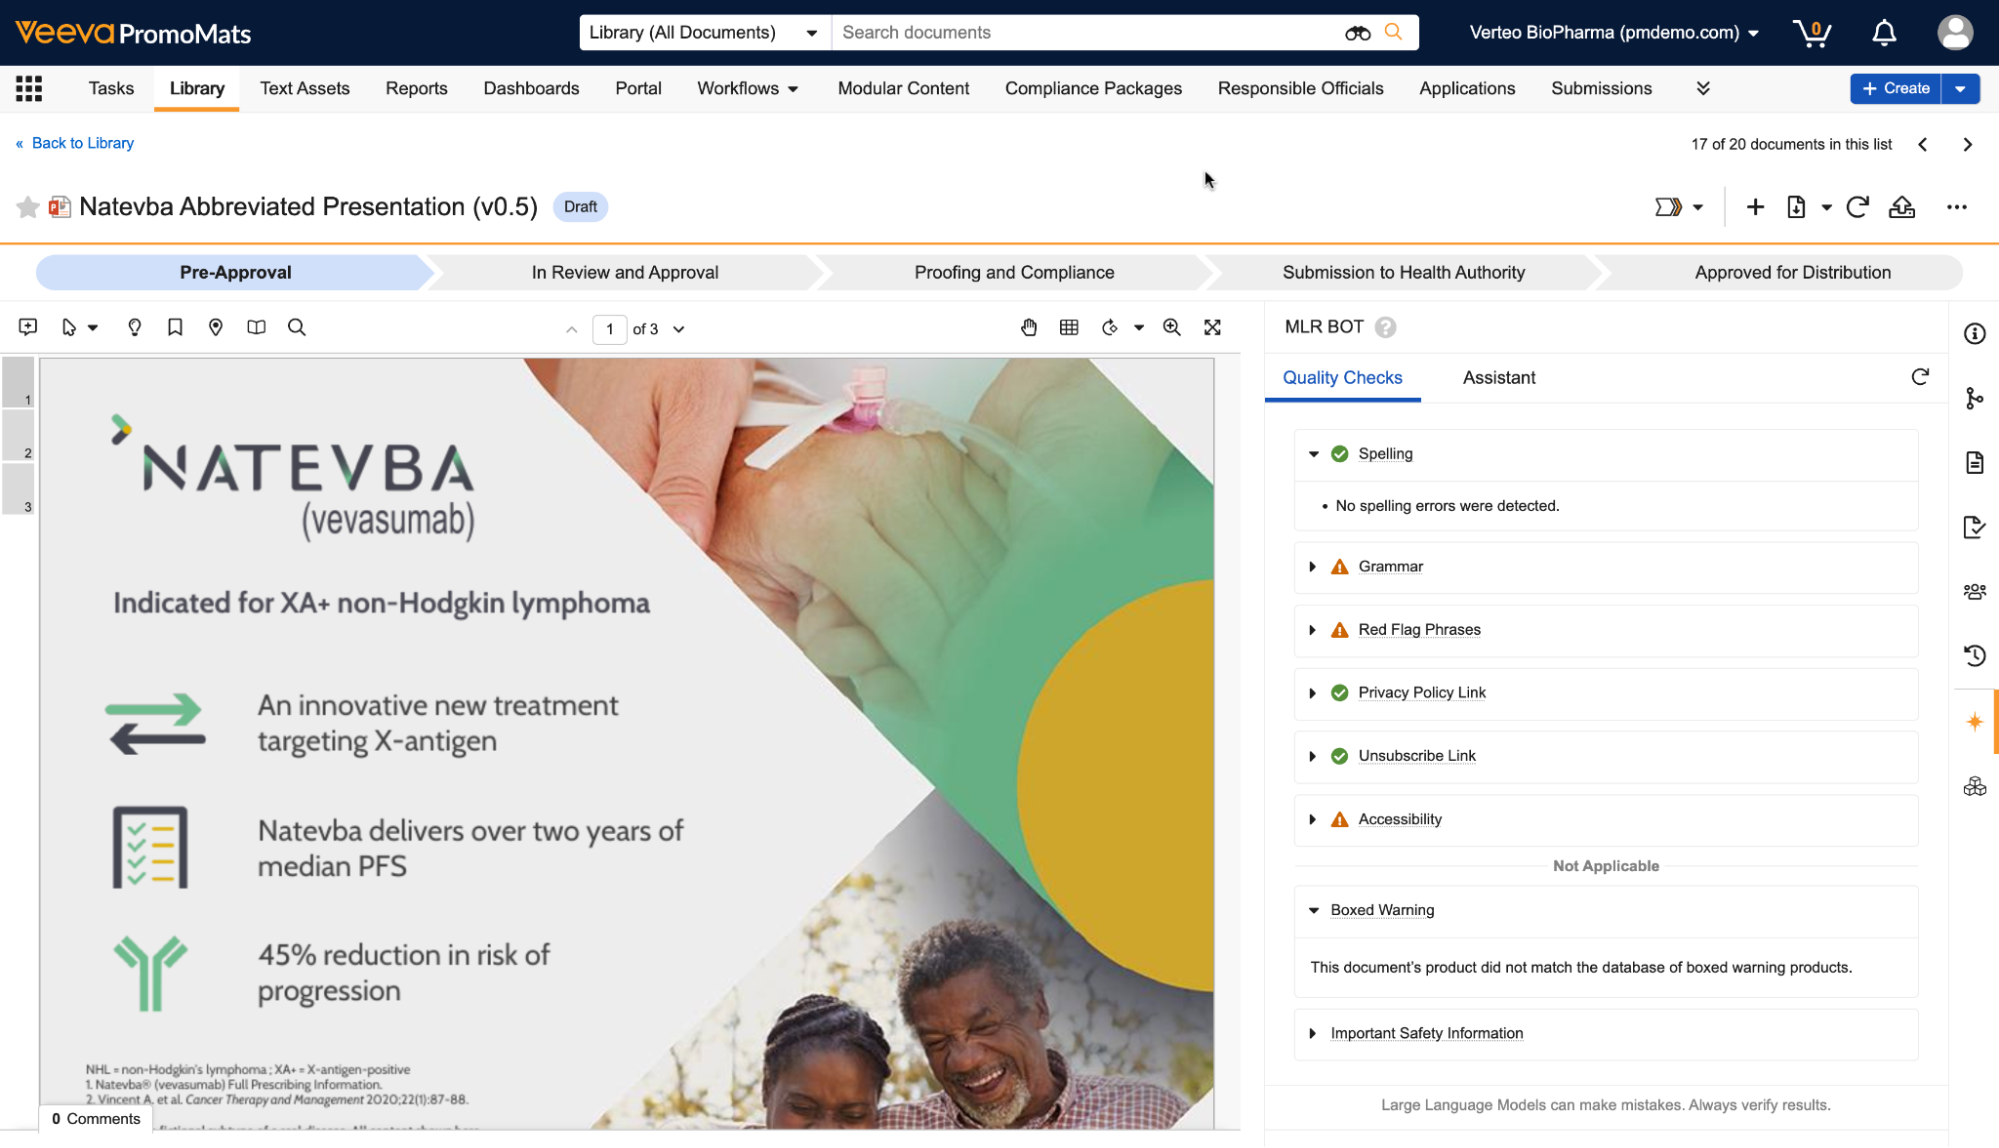
Quick Check Agent is designed to help content owners and coordinators prepare their documents for MLR review by detecting common issues before submission, such as spelling errors, sensitive phrases, and missing warnings or safety information. Leveraging a Large Language Model (LLM), Quick Check Agent proactively identifies a wide range of issues in your promotional materials, reducing the number of review cycles and accelerating time to approval.
Quick Check Agent is integrated directly within PromoMats, which means your documents and data do not leave your Veeva Vault environment, ensuring data stays secure, and user security is respected.
Once configured, the **Quick Check Agent** panel is available when all of the following conditions are met:
* The document type belongs to the _Quick Check Agent_ document type group.
* The current document version is the latest version.
* The document does not exceed 100 pages in length. If the document is longer than 20 pages, some checks operate differently, and Quick Check Agent does not evaluate images.
* The document has a PDF viewable rendition and does not contain audio or video content.
* The document is not in the _Steady_, _Superseded_, _Deleted_, or _Obsolete_ states.
* The document is not archived.
* The document is not a binder or CrossLink.
 Admins should perform the following configuration steps before Quick Check Agent is ready for use:
* Add the **Quick Check Agent** document type group to applicable document types.
* Optional: Create and update _Website_ object records to fully leverage the _Privacy Policy Link_ and _Unsubscribe Link_ quality checks.
## Assigning Quick Check Agent to Document Types
The _Quick Check Agent_ panel is only available on the Doc Info page if the document type has the **Quick Check Agent** document type group assigned.
To assign the **Quick Check Agent** document type group:
1. Navigate to **Admin > Configuration > Document Types**.
2. Next to your desired document type, click the **Actions** menu and select **Edit Details**.
3. In the _General_ tab, under _Document Type Groups_, select **Quick Check Agent**.
4. Click **Save**.
5. Optional: Repeat steps 1 - 4 for other document types.
## Assigning Document Type Roles
To use Quick Check Agent, users must be assigned a document role with _View Content_ permissions for the lifecycle state of the document version they're reviewing. You can manage which roles have _View Content_ permission per lifecycle state within the _Security Settings_ tab.
## Configuring Entry Criteria
To prevent documents from proceeding through their assigned lifecycle before Quick Check Agent has generated results, you can add the **Quick Check Agent** entry criteria to any document lifecycle state.
## Configuring a Product with a Boxed Warning {#boxed-warning-product}
To include products in the Boxed Warning check that are not yet in the FDA database, you must first add a custom Yes/No field called **QC Boxed Warning** (`qc_boxed_warning__c`) to the _Product_ object. By setting this field to **Yes** on a specific _Product_ record, you ensure that Quick Check Agent includes this product in its warning analysis alongside the official FDA list.
## Creating & Matching _Website_ Records
While performing the _Privacy Policy Link_ and _Unsubscribe Link_ quality checks, Quick Check Agent first determines whether those links should be present in this kind of document. If so, Quick Check Agent extracts any website links in the document, and determines if they match any _Website_ object records based on the _Country_ and _Language_ of the object record and on the document. Quick Check Agent interprets blank _Country_ and _Language_ fields to mean the _Website_ record applies to all countries or languages.
To create _Website_ records:
1. Navigate to **Business Admin > Objects > Website**.
2. Click **Create**.
3. Enter the **Website** URL.
4. In the _Distribution Channel Type_ drop-down, select the corresponding type: **Privacy Notice**, **Unsubscribe**, or **QR Code**.
5. Optional: Select a **Language**.
6. Optional: Select a **Country**.
7. Click **Save**.
## Related Permissions
You can complete all steps in this article with the standard _System Administrator_ or _Vault Owner_ security profile. If your Vault uses custom security profiles, your profile must grant the following permissions:
| Type | Permission Label | Controls |
| --- | --- | --- |
| Security Profile | Object: Website: Read, Create, Edit, Delete | Ability to see, create, edit, and delete _Website_ object records |
| Security Profile | Admin: Configuration: Document Lifecycles: Edit | Ability to edit existing items within **Configuration > Document Lifecycles**, including lifecycles, lifecycle states, and workflows |
| Security Profile | Admin: Configuration: Document Types: Edit | Ability to edit existing document types, subtypes, and classifications in the **Configuration > Document Types** page |
Admins should perform the following configuration steps before Quick Check Agent is ready for use:
* Add the **Quick Check Agent** document type group to applicable document types.
* Optional: Create and update _Website_ object records to fully leverage the _Privacy Policy Link_ and _Unsubscribe Link_ quality checks.
## Assigning Quick Check Agent to Document Types
The _Quick Check Agent_ panel is only available on the Doc Info page if the document type has the **Quick Check Agent** document type group assigned.
To assign the **Quick Check Agent** document type group:
1. Navigate to **Admin > Configuration > Document Types**.
2. Next to your desired document type, click the **Actions** menu and select **Edit Details**.
3. In the _General_ tab, under _Document Type Groups_, select **Quick Check Agent**.
4. Click **Save**.
5. Optional: Repeat steps 1 - 4 for other document types.
## Assigning Document Type Roles
To use Quick Check Agent, users must be assigned a document role with _View Content_ permissions for the lifecycle state of the document version they're reviewing. You can manage which roles have _View Content_ permission per lifecycle state within the _Security Settings_ tab.
## Configuring Entry Criteria
To prevent documents from proceeding through their assigned lifecycle before Quick Check Agent has generated results, you can add the **Quick Check Agent** entry criteria to any document lifecycle state.
## Configuring a Product with a Boxed Warning {#boxed-warning-product}
To include products in the Boxed Warning check that are not yet in the FDA database, you must first add a custom Yes/No field called **QC Boxed Warning** (`qc_boxed_warning__c`) to the _Product_ object. By setting this field to **Yes** on a specific _Product_ record, you ensure that Quick Check Agent includes this product in its warning analysis alongside the official FDA list.
## Creating & Matching _Website_ Records
While performing the _Privacy Policy Link_ and _Unsubscribe Link_ quality checks, Quick Check Agent first determines whether those links should be present in this kind of document. If so, Quick Check Agent extracts any website links in the document, and determines if they match any _Website_ object records based on the _Country_ and _Language_ of the object record and on the document. Quick Check Agent interprets blank _Country_ and _Language_ fields to mean the _Website_ record applies to all countries or languages.
To create _Website_ records:
1. Navigate to **Business Admin > Objects > Website**.
2. Click **Create**.
3. Enter the **Website** URL.
4. In the _Distribution Channel Type_ drop-down, select the corresponding type: **Privacy Notice**, **Unsubscribe**, or **QR Code**.
5. Optional: Select a **Language**.
6. Optional: Select a **Country**.
7. Click **Save**.
## Related Permissions
You can complete all steps in this article with the standard _System Administrator_ or _Vault Owner_ security profile. If your Vault uses custom security profiles, your profile must grant the following permissions:
| Type | Permission Label | Controls |
| --- | --- | --- |
| Security Profile | Object: Website: Read, Create, Edit, Delete | Ability to see, create, edit, and delete _Website_ object records |
| Security Profile | Admin: Configuration: Document Lifecycles: Edit | Ability to edit existing items within **Configuration > Document Lifecycles**, including lifecycles, lifecycle states, and workflows |
| Security Profile | Admin: Configuration: Document Types: Edit | Ability to edit existing document types, subtypes, and classifications in the **Configuration > Document Types** page |