# Configuring the eCTD Compliance Package

The eCTD Compliance Package feature [generates a new Compliance Package](/en/lr/65734/) with _Submission Ready_ copies of documents and converts Vault link annotations to relative PDF links. PromoMats does not submit the Compliance Package to the FDA. You'll need to export the generated Compliance Package to a separate publishing tool to submit it to the FDA. You can then mark the binder as _Submitted_ in PromoMats. Organizations with a PromoMats and a RIM Vault can [configure a standard Vault to Vault connection](/en/lr/72309/), enabling seamless flow from compliance package generation in PromoMats to package submission in RIM.

## Enabling eCTD Compliance Package Generation

To enable this feature, navigate to **Admin > Settings > Application Settings**. Under _Compliance Package Generation_, select the **Allow eCTD Compliance Package Generation** checkbox. The _Enforce Documents are in Steady State_ checkbox must be cleared. 

### Enabling Supporting Documents

You can also enable Supporting Documents, which allows users to upload documents that support promotional documents reviewed by a Health Authority. These documents may include annotated materials, labels or references, or clean materials.

To enable this feature, navigate to **Admin > Configuration > Document Types**. Click **Supporting Documents** and select **Activate** in the **Actions** menu.

Then, navigate to **Admin > Settings > Application Settings** and select the **Enable eCTD Support Documents Relationship** checkbox under _Compliance Package Generation_. Vault adds the relationship to the Base Document.

<div class="note-border alert-warning">
  <div class="alert alert-warning" role="alert">
    <div><i class="far fa-exclamation-triangle"></i></div>
    <div class="alert-text">
      <p><strong>Warning</strong>: Once enabled, this feature cannot be disabled.</p>
    </div>
  </div>
</div>


### Enabling Annotated PDF Links {#enabling-annotations}

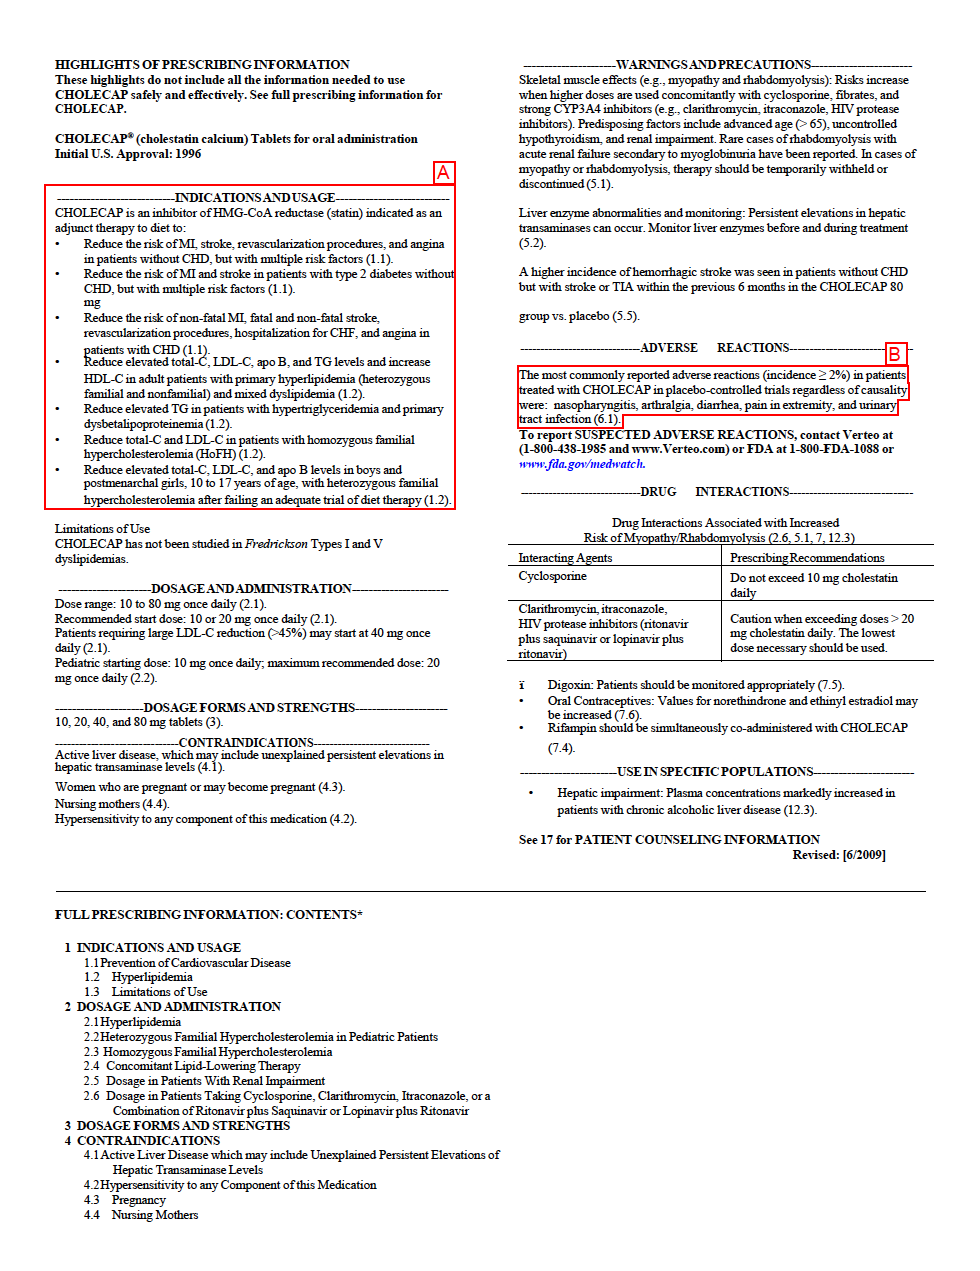
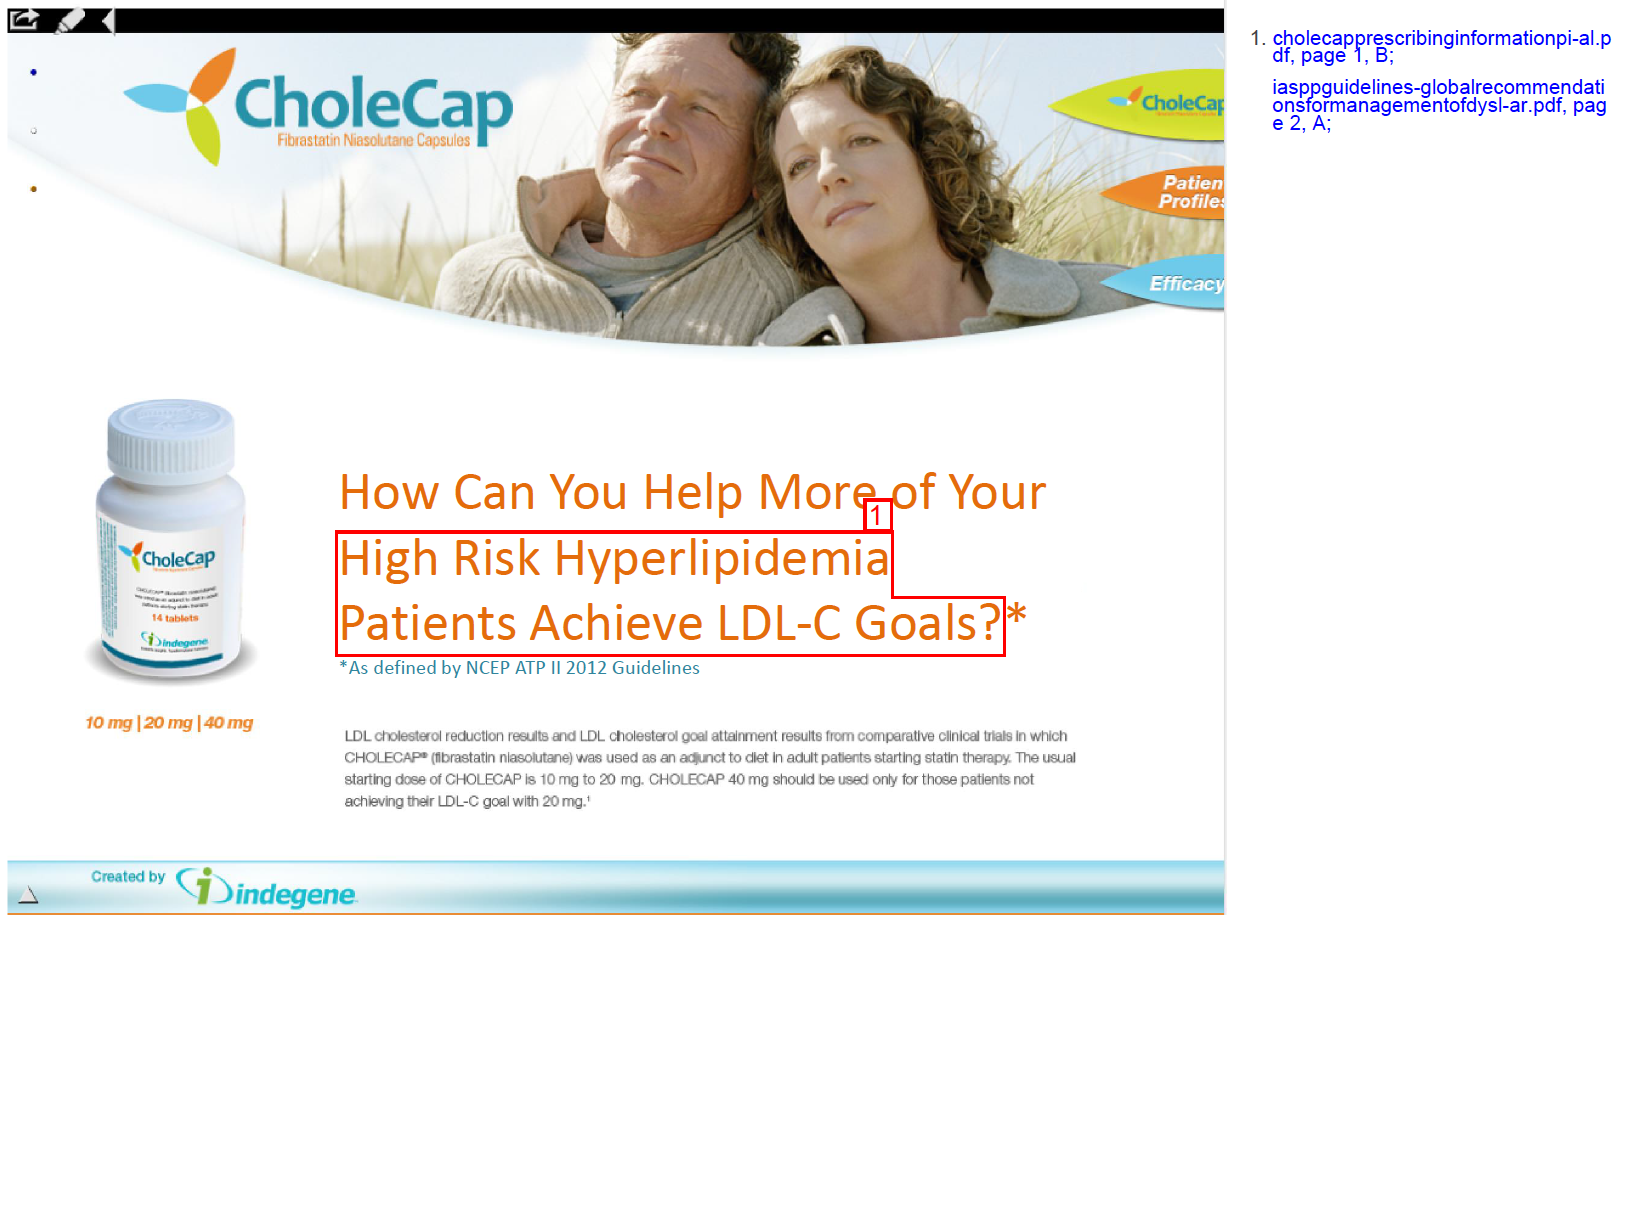
Redline markup is added to submission-ready copies in eCTD Compliance Packages where the _Include Linked References_ document field on the Compliance Package is set to **Yes**. With this feature, Vault outlines anchors on reference and labeling documents and annotates the markup with letter identifiers at the top right corner of the box. Vault does not outline page level or document level link annotations. Vault also adds boxes with number identifiers on the top right to annotated material documents in the eCTD Compliance Package. Vault includes margin notes on the right of the annotated material to list out the substantiating reference of each claim. Each note in the margin is a PDF hyperlink to the listed reference location.

<a href="https://platform.veevavault.help/assets/images/eCTD_Redline_Annotations_24R32.png" data-lightbox="redline" data-title="" data-alt="eCTD redline annotations">
  <img class="docimage" src="https://platform.veevavault.help/assets/images/eCTD_Redline_Annotations_24R32.png" alt="eCTD redline annotations" style="max-width: 300px;"  />
</a>

<a href="https://platform.veevavault.help/assets/images/eCTD_Redline_Annotations_MarginNotes_24R32.png" data-lightbox="redline" data-title="" data-alt="eCTD redline annotations">
  <img class="docimage" src="https://platform.veevavault.help/assets/images/eCTD_Redline_Annotations_MarginNotes_24R32.png" alt="eCTD redline annotations" style="max-width: 300px;"  />
</a>

## Configuration

### Document Types

You'll first need to configure eCTD document types to ensure that Vault generates the Compliance Package correctly:

  1. Navigate to **Admin > Configuration > Document Types**.
  2. Click the **eCTD Submission Ready Documents Actions** menu.
  3. Select **Edit Details**.
  4. Under _Global Content Type_, select **Health Authority Form / Compliance Package**.
  5. Click **Save**.

If you are not enabling Supporting Documents, you'll need to add the _Final Video/Audio_ rendition type to document types with storyboard or script elements:

  1. Navigate to **Configuration > Document Types**.
  2. Click the **Actions** menu on the applicable document type.
  3. Select **Edit Details**.
  4. Under _Rendition Types_, enter and select **Final Video/Audio**.
  5. Click **Save**.

By default, adding a _Final Video/Audio_ rendition or a Clean Version Supporting document adds an additional row to the 2253 Supplementary Forms. To prevent this:

  1. Navigate to **Admin > Configuration > Document Fields**.
  2. Click the document classification **eCTD Submission Ready Documents > Submission Ready Copies > Clean Material**.
  3. Activate the document field **Main Promotional Material?**
  4. Navigate to **Business Admin > Objects > XML Elements**.
  5. Find the **Exclude Doc Types** record.
  6. Update the formula as follows: `not(textEquals(DocInBinder.type__v, "Reference") ||textEquals(DocInBinder.type__v, "Health Authority Form") ||textEquals(DocInBinder.classification__v, "Annotated Label") ||textEquals(DocInBinder.classification__v, "Annotated Reference") ||textEquals(DocInBinder.classification__v, "Annotated Material") ||textEquals(DocInBinder.classification__v, "Clean Product Label") ||textEquals(DocInBinder.main_promotional_piece__v, "false") ||textEquals(DocInBinder.subtype__v, "Correspondence Letter"))`
  7. Repeat steps 5 - 6 with the **Exclude Doc Types (Supplementary)** record.

You can also add the **eCTD Submission Package** [rendition type](/en/lr/3037/#viewing) to document types. Once configured, users can upload a ZIP file containing multimedia materials to this rendition type. While generating a Compliance Package, Vault unzips the contents and adds them to the package as Clean Material. {:#ectd-rendition-type}

<div class="note-border alert-info">
  <div class="alert alert-info" role="alert">
    <div><i class="far fa-info-circle"></i></div>
    <div class="alert-text">
      <p><strong>Note</strong>: Vault does not convert the contents of the ZIP file to PDF. Do not include special characters in the filenames.</p>
    </div>
  </div>
</div>


### Document Fields

Adding the following document fields allows Vault to generate the eCTD Compliance Package with the publication date:

  1. Navigate to **Configuration > Document Fields**.
  2. Under _eCTD Submission Ready Documents_, expand **Submission Ready Copies**.
  3. Select **Annotated Material**.
  4. Click **Add** and select **Existing Shared Field**.
  5. Select **Dissemination / Publication Date** (`dissemination_publication_date__v`).
  6. Click **OK**.
  7. Repeat steps 3 – 6 with the **Clean Material** document type.

To use the _Promotional Material ID_ field instead of the _Promotional Document Number_ field, repeat steps 3 – 6 with the **Clean Material** document type and the **Promotional Material ID** field. To use the _Promotional Material ID_ field, you must [configure it](/en/lr/70743/) first. You can also configure eCTD Compliance Packages to use the _Promotional Material Document Name_ and _Description_ fields.

####  About the Material Type Document Field {#material-type}

If your Vault uses a custom version of the _Material Type_ field on document types for promotional materials, you'll need to check that the standard _Material Type_ field (`material_type__v`) is active and added to the appropriate document types. The _Material Type_ field must be populated on the promotional pieces that users include when generating the eCTD Compliance Package. If not, Vault will exclude the _Material Type_ from the 1.15.2.1 Material section of the eCTD Compliance Package and from section 8b of the 2253 form.

To ensure that this field is populated, we recommend adding the following field dependency rule:

  * Document type: _Material_
  * If field: _Submission Required_ equals _Yes_
  * Material Type (`material_type__v`): _is required_

You may also need to update the _Input: 7.b. Material Type (use FDA codes)_ **XML Element** record. To configure the XML element, open the record from  **Business Admin > Objects > XML Elements** and enter **`DocInBinder.material_type__v`** in the _Formula_ field.

#### Required Fields & the RIM to PromoMats Connection

The following table indicates whether Vault requires the listed document field when configuring and generating eCTD Compliance Packages. Field requirements vary based on whether your Vault uses the [RIM to PromoMats Vault Connection](/en/lr/72311/).

| Field | Vault with the RIM to PromoMats Connection | Vault without the RIM to PromoMats Connection |
| --- | --- | --- |
| Correspondence Letter (Preclearance only) | Required | Required |
| Name | Required | Required |
| Description | Optional | Optional |
| Country | Required | Optional |
| Product | Required | Required |
| Secondary Brands | Optional | Optional |
| Responsible Official | Recommended | Recommended |
| Reg Comments to FDA | Optional | Optional |
| Include Linked References | Required | Required |
| Center | Required for Preclearance Packages, recommended for Post Marketing Packages | Required for Preclearance Packages, recommended for Post Marketing Packages |
| Promotional Material Document Type | Required | Recommended |
| Launch Material Type (Preclearance only) | Recommended | Recommended |
| Professional/Consumer | Required | Recommended |
| Submission Date | Recommended | Recommended |
| Application | Required | Recommended |
| Dosage (Preclearance only) | Recommended | Recommended |
| Indication (Preclearance only) | Recommended | Recommended |
| Secondary Brands Application | Optional | Optional |

### Field Layout

When you enable eCTD Compliance Package generation, Vault automatically includes applicable fields, new and existing, in the custom sections under **Admin > Configuration > Field Layout**. You can rename and edit the [field layout sections](/en/lr/1535/). By default, Vault creates the following sections:

  * _Submission Details_ (`submission_details__c`)
      * _Revision_
      * _Material ID_
  * _eCTD Submission Details_ (`ectd_submission_details__c`)

      * _Promotional Material ID_
      * _Include Linked References_
      * _Center_
      * _Promotional Material Document Type_
      * _Launch Material Type_
      * _Professional/Consumer_
      * _Application_
      * _Submission Date_
      * _Dosage_
      * _Indication_
      * _Secondary Brands Application_
      * _Promotional Document Number_
      * _Promotional Material Information_
      * _Actual Submitted Date_
      * _Primary Submission_
      * _Submission Notes_

### Field Dependencies

You can configure field dependency rules to ensure that Vault populates the correct fields on the eCTD Compliance Package:

  1. Navigate to **Admin > Configuration > Field Dependencies**.
  2. Click **Create**.
  3. Select the following options:
      - **Controlled by document type**
      - Type: **eCTD Submission Ready Documents**
      - Subtype: **Submission Ready Compliance Package**
  4. Click **OK**.
  5. Add the following rules:
      - Field **Country** is required
      - Field **Responsible Official** is required
  6. Click **Save**.
  7. Repeat steps 2 – 6 with the following options:
      - **Controlled by document type**
      - Type: **eCTD Submission Ready Documents**
      - Subtype: **Submission Ready Compliance Package**
      - Classification: **Preclearance Compliance Package**
      - Field **Dosage** is required
      - Field **Indication** is required

### PI Labeling Document

To ensure that Vault uses the PI labeling document to create the _Submission Ready_ documents and places the documents correctly in the binder, verify that, under the _Compliance Package Generation_ checkbox on the **Settings > Application Settings** page, the **Labeling Document Type** is defined.

To ensure the PI labeling document information is added to the Form 2253 or supplementary form, verify the following information:

  * On the _Input: 5._ **XML Elements** record, the value in the _Formula_ field is: **`Document.product__v.current_pilabel_number__c`**.
  * On the specific _Product_ record, the **PI labeling document** is defined in the **Current PI/Label Number** field.

### Objects

Updates to the _Product_ and _Application_ objects are used in the Correspondence Letter for Preclearance Compliance Packages:

  * To configure the _Product_ object, update the **Product** [object page layouts](/en/lr/26387/) to add related object sections for **Dosage** and **Product Indication Join**. Ensure that the **Create new record in pop-up** setting is enabled for these related objects.
  * To configure the _Application_ object, add the standard _CBER BLA Supplement Number_ field to the page layout. If your Vault has a custom _CBER BLA Supplement Number_ field, you can inactivate or delete it.

<div class="note-border alert-warning">
  <div class="alert alert-warning" role="alert">
    <div><i class="far fa-exclamation-triangle"></i></div>
    <div class="alert-text">
      <p><strong>Warning</strong>: To ensure the eCTD Compliance Package generates successfully, ensure that any reference constraints on objects and fields pulled into the binder are valid and active.</p>
    </div>
  </div>
</div>


### Document Lifecycles

You'll need to configure the _Submission Ready Lifecycle_ to enable eCTD Compliance Package generation. Editing the existing user actions disables the previous Compliance Package generation functionality.

To configure the _Submission Ready Lifecycle_:

  1. Navigate to **Configuration > Document Lifecycles**.
  2. Click **Submission Ready Lifecycle**.
  3. On the _Details_ tab, click **Edit**.
  4. Verify that the _Health Authority Ready State_ is set to **Submission Ready**.
  5. Check that the _Steady State_ is set to **Submitted**.
  6. Check that the _Rejected State_ is **Revise and Resubmit**.
  7. Click **Save**, then click the **States** tab.
  8. Add the **Export eCTD Compliance Package** [user action](/en/lr/12339/) with the condition if _Binder_ equals _Yes_ to the _Draft_, _In Review_, _Revise and Resubmit_, and _Submission Ready_ states. We recommend using the action name as the label.
  9. Add the **Regenerate eCTD Compliance Package** [user action](/en/lr/12339/) with the condition if _Binder_ equals _Yes_ to the _Draft_ and _Revise and Resubmit_ states. We recommend using **Regenerate Compliance Package** as the label.
  10. Edit the [existing **Generate Form** user actions](/en/lr/12339/#edit-or-delete) on the _Draft_, _In Review_, and _Revise and Resubmit_ states to perform with the following conditions:
      - If the _Secondary Brands_ field is blank, allow the **Generate Form** action. Select _eCTD_ as the **Form Generation Type** and choose _FDA Form 2253 Root_ as the **Root XML Element**.
      - If the _Secondary Brands field_ is not blank, allow the **Generate Form** action. Select _eCTD_ as the **Form Generation Type**. Choose _FDA Form 2253 Root_ as the **Root XML Element**, and choose _Supplementary Sheet Root_ as the **Root XML**.
  11. Click **Save**.

### Entry Actions

When you configure the [entry actions](/en/lr/12399/) as described below, Vault automatically moves eCTD Compliance Package documents to the same state as the binder. To configure the entry actions:

  1. Navigate to **Configuration > Document Lifecycles > Submission Ready Lifecycle**.
  2. Verify that the following **System** **State Types** are set:
      - Starting: **Draft**
      - Steady: **Submitted**
      - In Review: **In Review**
      - Rejected: **Revise and Resubmit**
      - Health Authority Ready: **Submission Ready**
      - Obsolete: **Cancelled**
      - Deleted: **Cancelled**
  3. Create the following **entry actions**:

| Lifecycle State |  |  | From State Type | To State Type |
| --- | --- | --- | --- | --- |
| In Review | Always perform actions | Set binder content state type | Starting State, Rejected | In Review |
| Revise and Resubmit | Always | Set binder content state type | In Review, Health Authority Ready State, Starting State | Rejected |
| Submission Ready | Always | Set binder content state type | In Review, Rejected, Starting State | Health Authority Ready State |
| Submitted | Always perform actions | Set binder content state type | Health Authority Ready State | Steady State |
| Submitted | Always | Set binder content version binding to steady state | N/A | N/A |
| Submitted | Always | Set new major version | N/A | N/A |
| Submitted | If Promotional Material Document Type is Promotional 2253 | Update eCTD Source Document State* | N/A | Steady State |

\* When this entry action is configured, Vault changes the state of the _eCTD Source_ document when the state of the submission ready copy is updated. This action only affects documents where the _Main Promotional Material?_ field is set to _Yes_. The _Main Promotional Material?_ field is a system-managed field on the _eCTD Submission Ready Documents > Submission Ready Copies > Clean Material_ classification. This field must be active in order for the entry action to work.

The _Form 2253_ and _Supplementary Form_ are expected to be the _Health Authority Form_ document type. By default, these are included in the _Submission Ready Lifecycle_. If these documents are on another lifecycle in your Vault, we recommend moving them to the _Submission Ready Lifecycle_. If you choose to leave them on another lifecycle, you must ensure the state types are configured on that lifecycle. Navigate to the applicable lifecycle and ensure the state types below are set.

To configure the _General Lifecycle_, navigate to **Configuration > Document Lifecycles > General Lifecycle** and verify that the following **System State Types** are set:

  * _Starting_
  * _Steady_
  * _In Review_
  * _Health Authority Ready_
  * _Rejected_
  * _Deleted_
  * _Obsolete_

### Entry Criteria

You can add [entry criteria](/en/lr/12617/) to check that documents in the binder are in a specific state before the binder moves to the next state. The entry criteria are available to states in any lifecycle, but we recommend adding the following rule to the _Submission Ready_ lifecycle's _Submitted_ state:

  * Always validate that: **Binder Content**
  * **In state type**
  * Health Authority Ready State

### User Actions {#user-actions}

You can add a [user action](/en/lr/12339/) to allow users to add documents to the binder after Compliance Package generation and regenerate. The _Add Material to Compliance Package_ user action is available to any state in the _Submission Ready_ lifecycle, but we recommend adding the following rule to the _Draft_ state:

  * Perform with conditions: **If Binder equals Yes**
  * **Add Material to Compliance Package**
  * Action Label: **Add Material to Compliance Package**

### XML Elements {#xml-elements}

If you didn't use the previous Compliance Package functionality, you'll need to [configure several XML elements](/en/lr/37170/#mapping) to ensure that Vault generates FDA forms correctly:

  1. Upload the latest version of **Form 2253** from the FDA to Vault and select the **Health Authority Form** document type.
  2. Upload the latest version of the **Supplementary Form** from the FDA to Vault and select the **Health Authority Form** document type.
  3. Navigate to **Business Admin > Objects > XML Elements**.
  4. Open the **FDA Form 2253 Root** record.
  5. Click **Edit**. Under _Form Template_, add the **Form 2253** document.
  6. Click **Save**.
  7. Navigate back to **Business Admin > Objects > XML Elements**.
  8. Open the **FDA 2253 Supplementary Sheet Root** record.
  9. Click **Edit**. Under _Form Template_, add the **Supplementary Form** document.
  10. Click **Save**.

You'll also need to configure and create the _XML Element_ records corresponding to various parts of the eCTD Compliance Package in **Business Admin > Objects > XML Elements**. While some of these XML elements may already exist in your Vault, you'll need to manually add the others. You can also click the **Tree Layout** icon on the **Root: FDA Form 2253 Root** page to view the FDA Form hierarchy. You can reorder the sections and elements by clicking on the parent section and, on the element you want to move, clicking the **Actions** menu and under _Reposition_, select an option.

#### FDA Form 2253 Root

To configure the **Page 1 Section**, you'll first need to add and populate a new XML element section:

  1. Click **Page 1 Section**.
  2. Click **Create** and select **XML Element**.
  3. In the _Create XML Element_ dialog, select **Section**, then click **Continue**.
  4. Enter **Item 3 to 7 Section** in the _Name_ field.
  5. Enter **item3to7** in the _Element Name_ field.
  6. Click **Save**.
  7. Click **Form Start Section**.
  8. Click **Child Records**.
  9. On the _Proprietary Name_ element, click the **Actions** menu and select **Edit**.
  10. Decrease the number in the _Name_ field by a value of **1**.
  11. Under _Parent_, select **Item 3 to 7 Section**.
  12. Click **Save**.
  13. Repeat steps 9 – 12 with the following elements:
      * **Established Name**
      * **Product Code**
      * **Package Insert Date and ID Number (Latest final printed label)**
      * **License No. (Biologics)**
      * **Manufacturer Name**

Next, you'll need to update the **Form Start Section**:

  1. Click **Form Start Section**.
  2. Click **Create** and select **XML Element**.
  3. In the _Create XML Element_ dialog, select **Input**, then click **Continue**.
  4. Configure the new element as follows:
      * Name: **2. Application Number Part 2**
      * Element Name: **db_nda_bla_nmbr_pt2**
      * Formula: **`Document.application__v.cber_bla_supplement_number__c`**
  5. Click **Save**.
  6. On the _Date Submitted_ element, click the **Actions** menu and select **Edit**.
  7. Decrease the number in the _Name_ field by a value of **1**.
  8. Click **Save**.
  9. Repeat steps 6 – 8 with the following elements:
      * **Application Number**
      * **Application Type**
      * **Multiple Products**
      * **Single Product**

You'll also need to update the **Item 8** and **Comments** sections:

  1. Click **Item 8 Section**.
  2. Click the **Actions** menu and select **Edit**.
  3. Enter **Item 7 Section** in the _Name_ field.
  4. Enter **item7** in the _Element Name_ field.
  5. Click **Save**.
  6. Under _Item 7 Section_, click **Display Children** and select **Display All Descendants**.
  7. On the _b. Material Type (use FDA code)_ element, click the **Actions** menu and select **Edit**.
  8. Decrease the number in the _Name_ field by a value of **1**.
  9. Click **Save**.
  10.Repeat steps 7 – 9 with the following elements:
      * **Dissemination/Publication Date**
      * **Material ID**
      * **Material Description**
  11.Click **Comments Section**.
  12.On the _f. Comments_ element, click the **Actions** menu and select **Edit**.
  13.Decrease the number in the _Name_ field by a value of **1**.
  14.Click **Save**.

Then, you'll need to update section **Nine and Ten**:

  1. Click **Nine and Ten Section**.
  2. Click the **Actions** menu and select **Edit**.
  3. Enter **Item 8 to 9 Section** in the _Name_ field.
  4. Enter **item8to9** in the _Element Name_ field.
  5. Click **Save**.
  6. On the _City_ element, click the **Actions** menu and select **Edit**.
  7. Decrease the number in the _Name_ field by a value of **1**.
  8. Click **Save**.
  9. Repeat steps 6 – 8 with the following elements:
      * **Address 1 (Street address, P.O. box, company name ℅)**
      * **Address 2 (Apartment, suite, unit, building, floor, etc.)**
      * **Country**
      * **State/Province/Region**
      * **ZIP or Postal Code**
      * **a. Telephone Number (Include area code)**
      * **b. FAX Number (Include area code)**
      * **c. Email Address**

You'll need to update section **Eleven To Thirteen**:

  1. Click **Eleven To Thirteen Section**.
  2. Click the **Actions** menu and select **Edit**.
  3. Enter **Item 10 to 12 Section** in the _Name_ field.
  4. Enter **item10to12** in the _Element Name_ field.
  5. Click **Save**.
  6. On the _Typed Name and Title of Responsible Official or Agent_ element, click the **Actions** menu and select **Edit**.
  7. Decrease the number in the _Name_ field by a value of **1**.
  8. Click **Save**.
  9. Repeat steps 6 – 8 with the **Date** element.

Next, update **Fourteen Section**:

  1. Click **Fourteen Section**.
  2. Click the **Actions** menu and select **Edit**.
  3. Enter **Item 13 Section** in the _Name_ field.
  4. Enter **item13** in the _Element Name_ field.
  5. Click **Save**.

Then, create new XML element sections:

  1. Click **Create** and select **XML Element**.
  2. In the _Create XML Element_ dialog, select **Section**.
  3. Enter **CBER Section** in the _Name_ field.
  4. Enter **cber** in the _Element Name_ field.
  5. Click **Save**.
  6. Click **CBER Section**, then click **Child Records**.
  7. Click **Create** and select **Section**.
  8. Click **Continue**.
  9. Enter **Draft Section** in the _Name_ field.
  10.Enter **draft** in the _Element Name_ field.
  11.Click **Save**.
  12.Repeat steps 7 – 11 with **Final Section** as the _Name_ and **final** as the _Element Name_.

You'll also need to configure XML elements:

  1. On the _Draft (CBER only)_ element, click the **Actions** menu and select **Edit**.
  2. Decrease the number in the _Name_ field by a value of **1** and enter **Draft**.
  3. Under _Parent_, select **Draft Section**.
  4. Click **Save**.
  5. On the _Final (Post Marketing Compliance Package CBER only)_, click the **Actions** menu and select **Edit**.
  6. Decrease the number in the _Name_ field by a value of **1**.
  7. Under _Parent_, select **Final Section**.
  8. Click **Save**.

Finally, you'll need to update the **Professional** and **Consumer** elements:

  1. Under _FDA Form 2253 Root_, click **a. Professional**.
  2. Click the **Actions** menu and select **Edit**.
  3. Decrease the number in the _Name_ field by a value of **1**.
  4. Click **Save**.
  5. Repeat steps 1 – 4 with **a. Consumer**.


#### XML Element Fields

| XML Element | Fields to Update | Value |
| --- | --- | --- |
| Input: 1. Date Submitted | Formula | `Document.submission_date__v` |
| Input: Binder Details: Date Submitted | Formula | `Document.submission_date__v` |
| Input: 7. A. Professional | Formula | `textEquals(Document.professional_consumer__v, "Professional")` |
| Input: 7. D. Material ID | Name | `8. d. Material ID Code` |
| | Element Name | `db_material_code` |
| | Formula | `DocInBinder.promotional_document_number__v` |
| | XML Element Type | `Input` |
| | Parent | `Material Row Section` |
| Input: 13. Draft (CBER only) | Name | `14. Draft (CBER - APLB only)` |
| | Element Name | `db_draft` |
| | Formula | `textEquals (Document.center_ectd__v .name__v, "CBER - APLB") && textEquals (Document.classification__v, "Preclearance Compliance Package")` |
| | XML Element Type | `Input` |
| | Parent | `Item 13 Section` |
| Input: 13. Final (Post Marketing Compliance Package CBER only) | Name | `15. Final (Post Marketing Compliance Package CBER only)` |
| | Element Name | `db_draft` |
| | Formula | `textEquals (Document.center_ectd__v.name__v, "CBER - APLB") && textEquals (Document.classification__v, "Post Marketing Compliance Package")` |
| | XML Element Type | `Input` |
| | Parent | `Item 13 Section` |
| Document Row: Doc Number Input | Name | `Document Row: Doc Number Input` |
| | Element Name | `input_doc_number` |
| | Formula | `DocInBinder.promotional_document_number__v` |
| | XML Element Type | `Input` |
| | Parent | `Document Row Section` |
| Condition: Exclude Doc Types | Formula | <code>not(textEquals(DocInBinder.type_v, "Reference") ||textEquals(DocInBinder.typev, "Health Authority Form") ||textEquals(DocInBinder.classificationv, "Annotated Label") ||textEquals(DocInBinder.classificationv, "Annotated Reference") ||textEquals(DocInBinder.classificationv, "Annotated Material") ||textEquals(DocInBinder.classificationv, "Clean Product Label") ||textEquals(DocInBinder.main_promotional_piecev, "false") ||textEquals(DocInBinder.subtype_v, "Correspondence Letter"))</code> |
| Condition: Exclude Doc Types (Supplementary) | Formula | <code>not(textEquals(DocInBinder.type_v, "Reference") ||textEquals(DocInBinder.typev, "Health Authority Form") ||textEquals(DocInBinder.classificationv, "Annotated Label") ||textEquals(DocInBinder.classificationv, "Annotated Reference") ||textEquals(DocInBinder.classificationv, "Annotated Material") ||textEquals(DocInBinder.classificationv, "Clean Product Label") ||textEquals(DocInBinder.main_promotional_piecev, "false") ||textEquals(DocInBinder.subtype_v, "Correspondence Letter"))</code> |
| 2. Application Number | Formula | `Document.application__v.application_number__v` |
| 2. Application Type: | Formula | `Document.application__v.application_type__v` |
| 2. Application Name Part 2 | Formula | `Document.application__v.cber_bla_supplement_number__c` |
| Binder Details: Application Number Input | Formula | `Document.application__v.application_number__v` |
| Binder Details: Application Type Input | Formula | `Document.application__v.application_type__v` |
| Secondary Brand Row: Application Number Input | Formula | `SecondaryBrand.application_c.application_number_v` |
| Secondary Brand Row: Application Type Input | Formula | `SecondaryBrand.application_c.application_type_v` |
| 6. Manufacturer Name | Formula | `Document.application__v.applicant__v.name__v` |
| 8. Address 1 (Street address, P.O. box, company name ℅) | Formula | `Document.application__v.applicant__v.address_1__v` |
| 8. Address 2 (Apartment, suite, unit, building, floor, etc.) | Formula | `Document.application__v.applicant__v.address_2__v` |
| 8. State/Province/Region | Formula | `Document.application__v.applicant__v.state_province_region__v` |
| 8. City | Formula | `Document.application__v.applicant__v.city__v` |
| 8. ZIP or Postal Code | Formula | `Document.application__v.applicant__v.zip_or_postal_code__v` |
| 8. Country | Formula | `Document.application__v.applicant__v.country__v` |
| Binder Details: Applicant Input | Formula | `Document.application__v.applicant__v.name__v` |

You can exclude other document types by adding them to the _Condition_ elements records as defined in the formula values above.

###  Correspondence Letters {#correspondence-letters}

When configured, Vault automatically generates a Correspondence Letter for Preclearance Compliance Packages. The letter contains information required by the FDA.

To configure the Correspondence Letter:

  1. Download the <a class="download-link " href="https://platform.veevavault.help/assets/downloads/eCTD_Correspondence_Letter_Template.docx" target="_blank" rel="noopener">**Correspondence Letter template**<i class="fa fa-download" aria-hidden="true"></i></a>.
  2. Update the document with your company's information.
  3. In Vault, navigate to **Business Admin > Templates > Documents & Binder > eCTD Submission Ready Documents**.
  4. Click **Create** and select **Document Template**.
  5. Select the **Basic Document Template** type.
  6. Enter a **Correspondence Letter** label.
  7. Click **Upload File** and select the Correspondence Letter template.
  8. Click **Save**.

You can create multiple Correspondence Letter templates, allowing users to select the applicable letter when generating the Preclearance Compliance Package.

You need to ensure the _Promotional Material Information_ document field is not hidden on the Correspondence Letter. Hiding this document field prevents Vault from populating the _Material Type_, _Material ID_, and _Material Description and Product_ fields on the Correspondence Letter.

### Workflow

After generating the Compliance Package, users must send the binder through a _Submission Ready_ review workflow until it reaches its _Steady_ state.

We recommend that you deploy the configured workflow using a [configuration migration package](/en/lr/36919/). Click <a class="download-link " href="https://platform.veevavault.help/assets/downloads/ectd-submission-ready-workflow.vpk_.zip" target="_blank" rel="noopener">here<i class="fa fa-download" aria-hidden="true"></i></a> to download a VPK, then [deploy](/en/lr/36919/#deploy) the workflow configuration. When you deploy, Vault adds the workflow to the _Submission Ready_ lifecycle. If you're using the VPK, you'll need to add [user actions](/en/lr/12339/) to the _Draft_ and _Revise and Resubmit_ states to perform with the condition that if _Binder_ equals _Yes,_ allow the **Submission Ready Workflow** action. Enter **Send for Review** as the action label.

### Permission Sets

You may want to [configure permissions](/en/lr/23647/#how_to_edit_permission_sets) on the objects introduced in the eCTD Compliance Package feature. As a best practice, we recommend restricting permissions to users who require them.

To configure permissions:

  1. Navigate to **Users & Groups > Permission Sets**.
  2. Add the _Read_ permission for the **Center** and **Promotional Material Document Type** objects for all users that will create, review, or approve the eCTD Compliance Package.
  3. Add the _Read_ permission for the **Indication**, **Dosage**, and **Product Indication Join** objects for all users that will create, review, and/or approve the eCTD Compliance Package. Add the _Edit_ permission for all users who will create these records.
  4. Add the _Create_ permission for the **Promotional Material Information** object for all users that will perform the bulk action to create the eCTD Compliance Package.  Add the _Read_ permission for all other users who need to view, review, and/or approve the eCTD Compliance Package.

Vault creates copies of the promotional, PI labeling, and reference documents included for submission to the FDA when users generate a compliance package. You'll need to add _View_ and _Edit_ permissions for the _Submission Ready_ documents for users and groups as required. We recommend limiting permissions to the users that will be generating, reviewing, or publishing the eCTD Compliance Package.

To add document type permissions:

  1. Navigate to **Configuration > Document Types**.
  2. Select **eCTD Submission Ready Documents**.
  3. Click the **Actions** menu and select **Edit Details**.
  4. Click the **Security** tab.
  5. Under _Viewers_ and _Editors_, add users and groups as appropriate.
  6. Click **Save**.

You may prefer to edit the [_Security Settings_](/en/lr/2572/#view) on each _Submission Ready_ _Lifecycle_ state for the following roles:

  * Owner
  * eCTD Regulatory Reviewer
  * Compliance Package Publisher

You'll also need to add the _Edit Document_ and _Version_ permissions to the **eCTD Compliance Package Generator** and **Compliance Package Generator** roles for the _Draft_ state of any lifecycles using the _Form 2253_ and _Supplementary Form_ document types. By default, this is the _General Lifecycle_.

To ensure that Vault creates relative PDF links on the annotated material in the eCTD Binder during the Compliance Package generation, you'll need to determine which lifecycle your Promotional Material is using, such as the **Material** lifecycle. Then, you'll need to add the _Annotate_ permission to the state in which the user performs the bulk action to create the eCTD binder, such as the **Submit to Health Authority** state. Add the permission for any roles that might perform the _Create Post Marketing Compliance_ or _Create Pre-Clearance Compliance Package_ bulk action in the lifecycle state's [_Security Settings_](/en/lr/2572/#view).

##  Configuring Multiple Compliance Package Generation {#bulk-gen-config}

While configuring the eCTD Compliance Package feature, you can also configure multi-package generation, allowing users to generate multiple Compliance Packages at once. 

In addition to the configuration outlined above, you must perform the following steps to use the bulk package generation functionality:

  * Navigate to **Admin > Settings > Application Settings** and, under _Compliance Package Generation_, select **Enable action to generate multiple eCTD Compliance Packages**.
  * Optional: Enable the flag to include Linked References for Preclearance and/or Post Marketing packages. This defaults the selection for that package type when using the action to generate multiple Compliance Packages.
  * Ensure that any promotional material document types use the standard [_Material Type_][1] (`material_type__v`) field. Vault does not support multi-package generation using documents with a custom _Material Type_ field. 
  * Ensure any promotional material document types use the standard _Professional / Consumer_ (`professional_consumer__v`) document field. Vault does not support multi-package generation using documents with a custom _Professional / Consumer_ field.
  * Add the _Health Authority Submission_ (`health_authority_submission__v`) field to your promotional material document types. This replaces the _Submission Type_ (`submission_type__c`) or custom document field you used previously. This field leverages the [Controlled Vocabulary](/en/lr/576703/) to indicate whether the document requires a Post Marketing or Preclearance package.
  * Set the _Country_ field to **United States** on United States _Applications_. 
  * Navigate to **Business Admin > Objects > Countries > United States** and enter the ISO code `US` in the _Code_ field. While only the United States code is required for this feature, we recommend adding all country codes.
  * Populate the **Center** (`ha_center__v`) field on _Application_ object records. We recommend inactivating the `center__v` field if you are not using it as part of a Vault configuration. 

If your Vault uses the [RIM to PromoMats Vault Connection](/en/lr/72311/), you must perform these additional steps:

  * Add the ISO code `US` to the _United States_ [_Country_](/en/lr/5450/) record in your RIM Vault.
  * On PromoMats, inactivate the **Center** (`center__v`) field rule under **Admin > Connections > Integration Rules > rim_application_ir__v > Field Rules**.
  * On PromoMats, activate the **Country** (`country__v`) field rule under **Admin > Connections > Integration Rules > rim_application_ir__v > Field Rules**.


[1]: #material-type
[2]: #enabling-annotatations