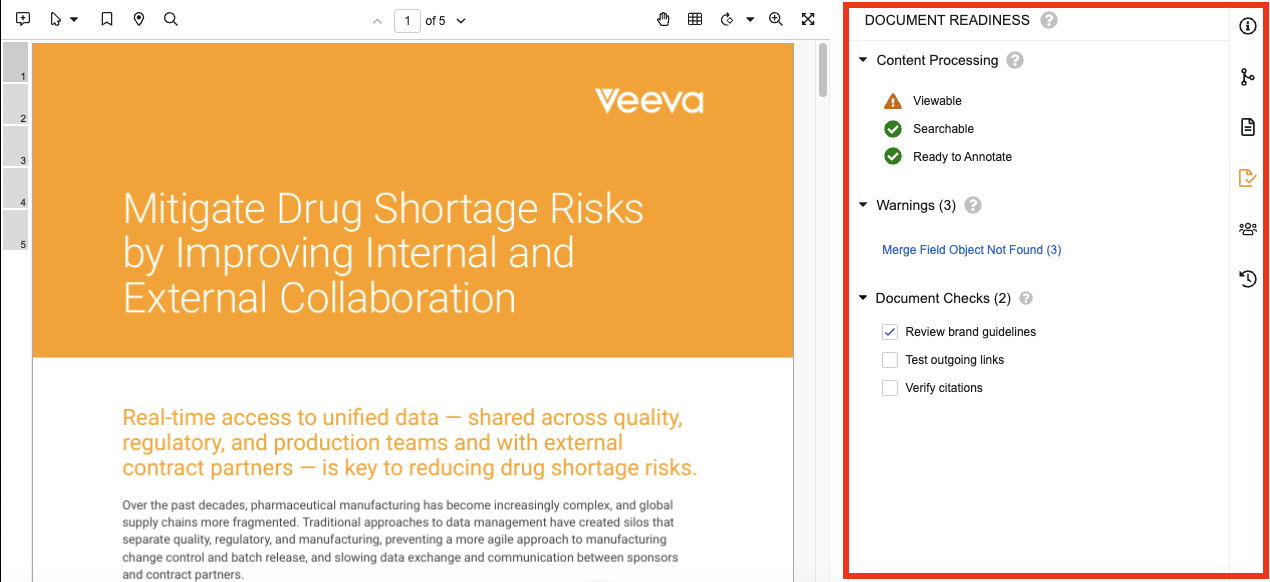
The Document Readiness panel on the Doc Info page provides users and Admins improved visibility into the processes contributing to a document’s readiness for use in Vault. The panel displays statuses related to rendition generation, searchability, and annotations; warnings related to these operations and how to address them; and document checks to aid users during document reviews.
Configuration Overview
The following configuration options are available for the Document Readiness panel:
- Create document check sections, associate them with the appropriate document types, and create the individual document checks.
- Configure lifecycle state entry criteria to validate for outstanding document warnings or checks.
- Create a document readiness report type for running document readiness metrics reports.
Configuring Document Checks
Document checks are document type-specific checklist items displayed in the Document Readiness panel to help guide users in documentation reviews.
Admins can configure document checks and use them in lifecycle state entry criteria to ensure that users have completed all checks before a document can proceed in its lifecycle. Once an Admin has configured document checks, they are only visible on new document versions created after the checks have been configured.
The following example shows a document check section labeled Clinical Checklist with seven (7) outstanding document checks in the Document Readiness panel:

Creating Document Check Sections
- Navigate to Admin > Configuration > Document Checks.
- Click Create on the All Document Check Sections page.
- Enter a Section Label. This label is displayed as the section heading for the document checks in the Document Readiness panel. The system populates the Section Name field according to the Section Label.
- Enter or update the Section Name.
- Optional: Select a Status of Active or Inactive. Document check sections are created as Active by default. Inactive sections are not displayed in the Document Readiness panel.
- Optional: Enter Help Text for the document check section. This help text is displayed when users hover over the question mark () in the document check section heading in the Document Readiness panel.
- Select the applicable Document Types. The document check section and its checks are displayed for all selected document types.
- Click Save. The system saves the document check section and opens the Document Check Section page where you can create and manage document checks.
Creating Document Checks
- In Admin > Configuration > Document Checks, open the document check section to which you want to add document checks.
- Click Create in the Checks section of the Document Check Section page.
- Enter a Check Label. This label is displayed as the document check text in the document check section of the Document Readiness panel. The system populates the Check Name field according to the Check Label.
- Optional: Enter Help Text for the document check. This help text is displayed when users hover over the document check label in the Document Readiness panel.
- Select a Status of Active or Inactive. Document check sections are created as Active by default. Inactive checks are not displayed in the Document Readiness panel.
- Click Save to save the document check and return to the Document Check Section page or Save + Create to save the document check and add another document check.
Modifying Document Checks
After creating document checks in a document check section, you can update their label, text, and status, update the order in which the document checks are displayed, and delete document checks.
To modify document checks:
- In Admin > Configuration > Document Checks, open the document check section that contains the document checks you want to modify.
- Click Reorder to update the order in which the document checks are displayed in the document check section. Drag and drop the checks in the order you want or click Sort A - Z to sort them alphabetically.
- Click Save to save the updated document check order.
- Click Delete () in a document check row to delete a document check. Click Continue in the confirmation dialog to confirm that you want to delete the document check.
- To update the text of a document check, double-click the Check Label or Help Text cell and modify the text.
- To update the status of a document check, select the status from the Status drop-down. Inactive checks are not displayed in the Document Readiness panel.
Configuring Lifecycle State Entry Criteria
Admins can configure lifecycle state entry criteria to validate for the existence of outstanding warnings or checks before the document can be transitioned to a specific state.
To configure document warning validation, navigate to Admin > Configuration > Document Lifecycles > [Lifecycle] > States > [State] > Entry Criteria and create a rule where the Document Warnings field is equal to 0.
To configure document check validation, create an Entry Criteria rule where the Document Checks field is equal to 0.
Creating the Document Readiness Report Type
The Document Readiness Metrics (document_readiness_metrics__sys) object allows for reporting on outstanding document warnings and checks. To create a report for outstanding warnings and checks, an Admin must first create the necessary report type in Admin > Configuration > Report Types.
The following example Document Readiness Metrics report displays documents with outstanding document warnings and the number of warnings:

Limits
Users can create up to 10 document check sections and up to 20 checks per section.
Related Permissions
| Type | Permission Label | Controls |
|---|---|---|
| Security Profile | Admin: Document Checks: Read, Create, Edit, Delete | Ability to access the Admin > Configuration > Document Checks page (Read), ability to create document checks (Read and Edit), ability to edit existing document checks (Edit), and ability to delete document checks (Delete) |
| Security Profile | Application: API: Metadata API | Ability to access the Admin > Configuration > Document Checks page |