You can create report templates in Microsoft Excel and use them to export, analyze, and share Vault reports. You can format Excel templates using all of Excel’s functionality, including pivot tables, macros, formulas, charts, and conditional formatting. Once you create a template and upload it to a report in your Vault, other users can use the template to export the report to Excel.
About Excel Report Templates
Vault generates a sample Excel template for every report. The sample includes an Export tab with all of the columns in the report and a Cover Page tab with metadata about your report, like the report name, description, and the date that it was exported. Vault generates the Cover Page tab using tokens similar to those used on a PDF report cover page.
Vault updates a report’s sample template each time you make changes to the report. You can download the sample template and customize it however you like by moving data between tabs, adding custom tabs, renaming columns, and more. However, you should not change the tokens in the sample template. Changing the tokens will prevent Vault from correctly populating the report template. If you accidentally make unwanted changes to the sample template, you can always download it again.
Custom Formatting with Excel Templates
See below to watch a video tutorial on custom formatting with Excel Templates:.
Downloading a Sample Template
You can find the sample template for any report in the Advanced Options section of the report. To download a sample template:
- Open the report and click Edit.
- Expand the Advanced Options section.
- Click Sample to download the file.
Updating a Template
You can update the sample template in several ways.
Using Column Tokens
You can use column tokens to reference data in your Excel template the same way you use tokens in Vault. Column tokens are similar to VQL syntax.
When using column tokens, be sure to keep them on the same row. Vault doesn’t recognize column tokens on multiple rows.
Using Named Ranges
Named ranges reference the label and top and bottom values of a column using these formats:
- object.fieldLabel
- object.fieldTop
- object.fieldBottom
For example, in a workflow report with a column called Task Due Date, you would use the following named range in your template:
- ${task.task_due_date__vLabel}
- ${task.task_due_date__vTop}
- ${task.task_due_date__vBottom}
You can use named ranges to create formulas in your template. For example, if you have an expense report template with a Total column, you could calculate the sum of the Total column with the following formula:
=SUM(expense__v.total__vTop:expense__v.total__vBottom)
When you add a formula to a column in a template, the formula is automatically copied down to all of the cells in the column.
Using Pivot Tables
To use pivot tables in an Excel template, ensure the following conditions are met:
- The pivot table Table/Range is defined using a named range to account for varying row numbers.
- The pivot table is set to refresh data when opening the file.
Defining the Pivot Table Range Name
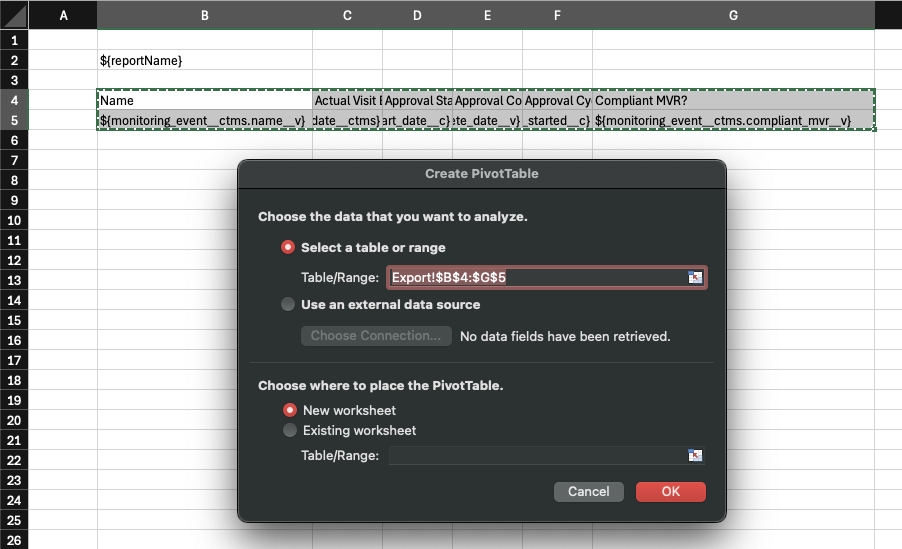
When creating a pivot table, Excel defaults the Table/Range using the row numbers and column letters of the selected cells. In the example below, Excel automatically sets the Table/Range to Export!$B$4:$J$5.
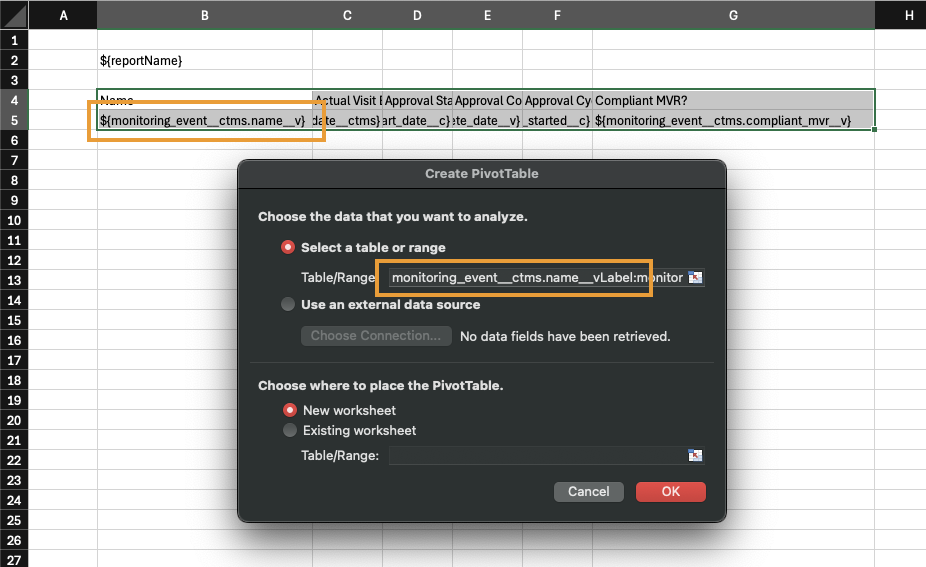
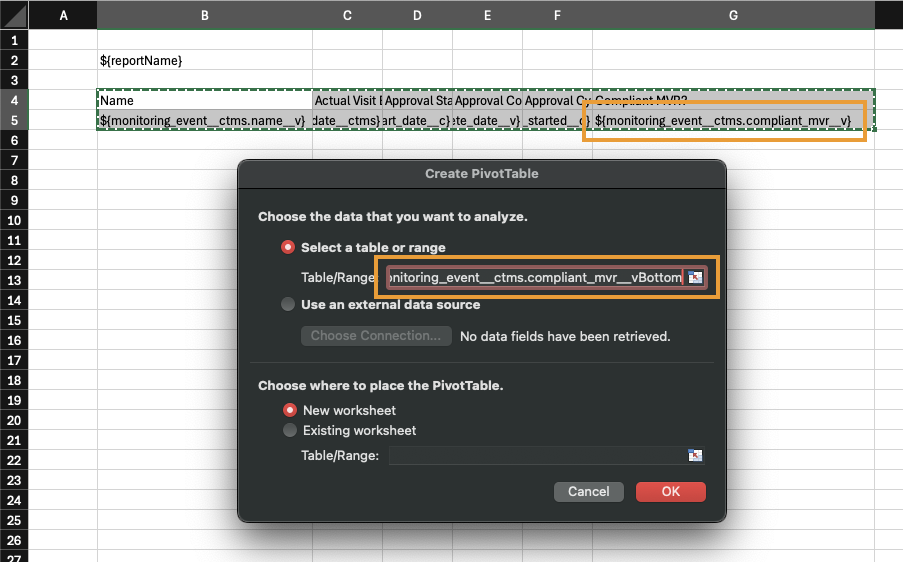
The number of rows may vary in an Excel template, so changing the defaulted Table/Range to a named Table/Range accounts for different row numbers. To do this, use the following format: [object.field]Label:[object.field]Bottom, where [object.field]Label is the upper-left cell of your range, and [object.field]Bottom is the lower-right cell of your range. In the example below, the updated Table/Range name is monitoring_event__ctms.name__vLabel:monitoring_event__ctms.deadline_for_compliant_mvr__cBottom.
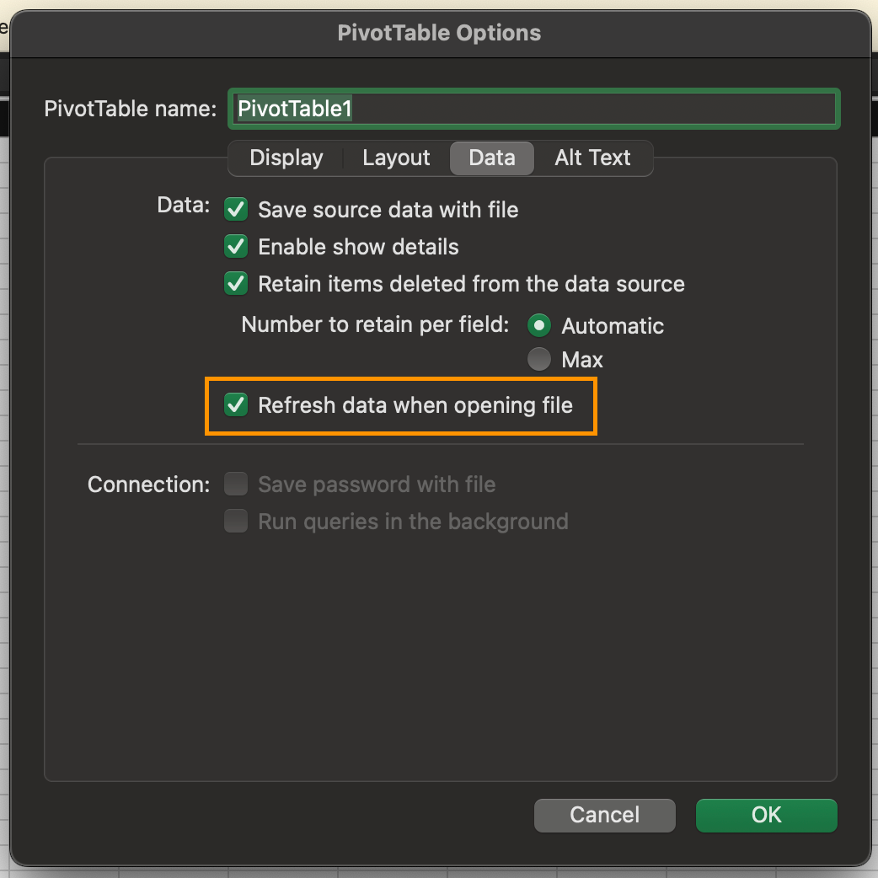
Setting the Pivot Table to Refresh on Opening
In the PivotTable Options dialog, ensure the Refresh data when opening file checkbox is selected in the Data tab.
Uploading a New Template
Once you have customized your Excel template, you can upload it back to Vault:
- Open the report and and click Edit.
- Expand the Advanced Options section.
- Click Upload and select the template file on your computer.
- Save the report.
Modifying an Existing Template
To make updates to an existing Excel template:
- Open the report and click Edit.
- Expand the Advanced Options section.
- Open the existing template’s Actions menu and click Download.
- Make changes to the template file in Excel.
- Open the template’s Actions menu again and click Upload to load the updated template.
Exporting to a Template
Once you have created an Excel template and uploaded to a report in Vault, you can export the report to the Excel template. Vault populates the template with data from the report and saves it as an Excel file with the same file name as the template.
How to Export a Report to an Excel Template
You must run the report before you can export it to the Excel template. After you run the report, open the report’s Actions menu, click Export to Excel and select Template.
Removing a Template
To remove an Excel template from a report:
- Open the report and click Edit.
- Expand the Advanced Options section.
- Click Remove from the template file’s Actions menu.
- Save the report.
Limitations
- Matrix reports are not compatible with Excel templates.
- Excel templates must be XLSX or XLSM files to be used with Vault reports. Vault does not support XLS file templates.
- Excel templates do not copy down table formatting. We recommend using conditional formatting instead.
- You can only include tokens in the first five (5) sheets of a template.
- Excel templates support unzipped Excel files up to 10 MB. We recommend deleting unwanted external data and empty cells and clearing the pivot table cache.
Related Permissions
The following permissions control your ability to upload an Excel template to a report:
Security Profile
- Objects: Report: Edit
- Controls ability to upload a template to a report.