VeevaID is an Identity Provider (IdP) system that allows you to use a single login for all Veeva applications such as Study Portal, SiteVault, and Study Training.
Registration Methods
You can register for a VeevaID account either via an invitation sent by an Admin or via self-registration. Generally, you only need to register once to establish your VeevaID for all intended applications, however some limitations may apply.
While you must ultimately be invited to an application to use it, self-registration can occur parallel to the invitation process. This means:
- An Admin can invite you to register, and you’ll receive one registration email for each application. In this case, click the Register Here link in one invitation to register for VeevaID and access all applications.
- If you do not click an invitation’s Register Here link, you can alternatively self-register at id.veeva.com to achieve similar results. In this case, VeevaID directs you to the Pending Vault Invites screen with a list of all applications with outstanding invitations.
- This screen does not include invitations which have expired. However, upon successful login to one application, you are automatically granted access to any application on the same domain. See additional details on application-specific limitations.
- If you self-register prior to receiving any invitations, you are still granted a VeevaID account. However, you are not granted access to any applications until you accept at least one valid, non-expired invitation.
- Similarly, if you self-register after all pending invitations have expired, you are still granted a VeevaID account. However, you are not granted access to any applications until an Admin re-sends an invitation and you successfully log in to at least one application.
VeevaID Home
You can use VeevaID Home to register and manage your account, as well as access all of your Veeva Applications such as Study Portal, SiteVault, and Study Training. Access VeevaID by navigating to id.veeva.com or from the Vault Selector.
VeevaID Self-Registration
To self-register for VeevaID:
- Navigate to id.veeva.com and click Register here.
- Enter your email address.
- Select Continue.
- An email will be sent to the email address you entered with the subject VeevaID Registration. Open this email and select Click Here To Register.
- Enter your First Name and Last Name.
- Optional: Enter you Prefix, Middle Name, and/or Suffix.
- Select your Language, Locale, and Timezone.
- Select Continue.
- Enter and confirm a Password conforming to the password requirements.
- Select Continue.
VeevaID loads the Pending Vault Invites screen with a link to each application to which you are invited, with each link reflecting the organization and application name, for example “VeePharm (Site Connect)”. Click any link to access that application.
Upon successful login to one application, you are automatically granted access to any application on the same domain. See additional details on application-specific limitations.
Note: It is possible for you to complete self-registration but be unable to access an application as expected. This most commonly occurs when you self-register but do not log in to any applications, and then your outstanding invitations expire. When this occurs, contact your Admin to resend your invitation.
Logging Into VeevaID
Your email address is your username. The first time you log in on a new device or in a new country, you must enter your email address and password, as well as authenticate your account using the four-digit verification code the portal sends to your registered email address.
On all other subsequent logins, VeevaID remembers the last email address you used and you only need to enter your password. Additionally, you will be prompted to authenticate using the four-digit verification code again once every seven days. If you have multiple VeevaID accounts or share a computer with another VeevaID user, you can select Switch user to enter a different email address.
Note: When you log out of Vault, you are automatically logged out of VeevaID as well.
Using the Systems Page
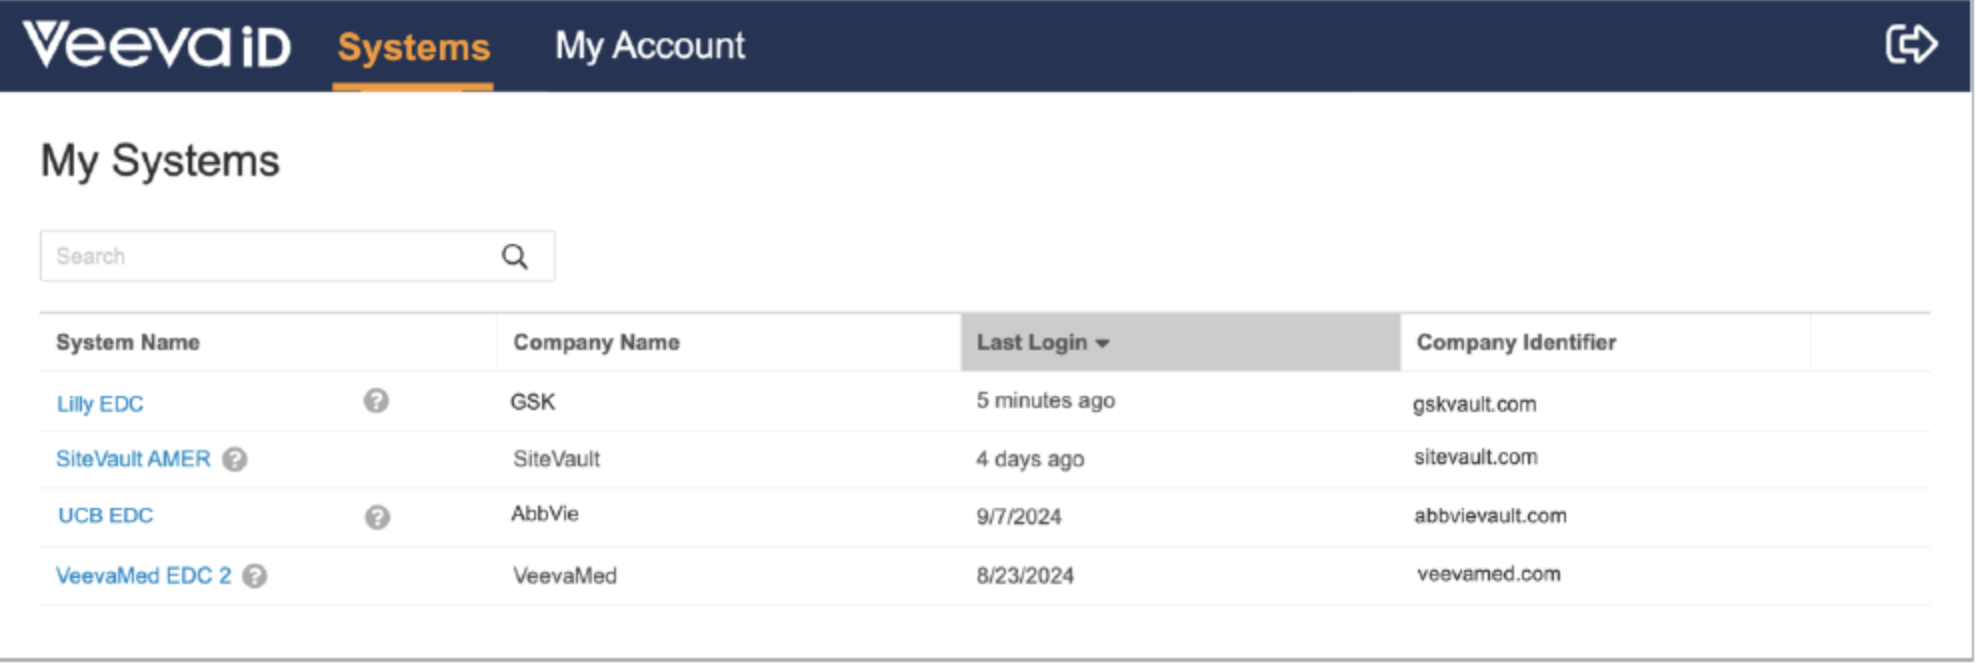
Upon logging into VeevaID, you are directed to the Systems page. It shows a list of all systems to which your VeevaID account has access. Click a System Name to access that system.
Using the My Account Page
You can reach the My Account page either by logging in at id.veeva.com and selecting My Account or by selecting Go to My VeevaID Account from your Vault user profile. The My Account page consists of three tabs: General, Emails, and Change Password.
The General tab displays the following information about your account:
- Prefix
- First Name
- Middle Name
- Last Name
- Suffix
- Mobile Phone
- Language
- Locale
- Timezone
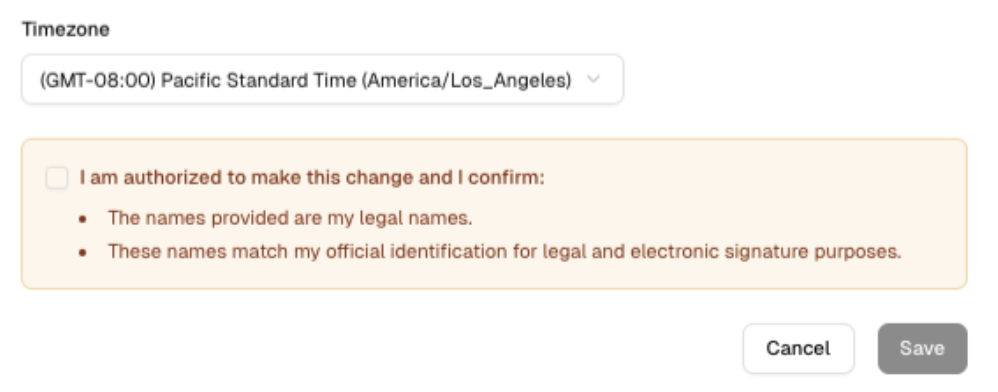
Select Edit to update this information. To save changes to any of your personal details on the General tab, such as First Name and Last Name, select the authorization checkbox before clicking Save.
The Emails tab displays your Primary Email, which also functions as your VeevaID username. You can change your email address, which changes your VeevaID username.
The Change Password tab allows you to change your VeevaID password. To do so, enter your Current Password, enter and confirm your New Password, then select Save Your Password.
The Recent Activity tab displays a list of your last 100 logins. This tab includes the following columns:
- Status: Success or Failure
- Operating System: The operating system used during the login.
- Browser: The browser used during the login.
- Last Sign-In: The date or amount of time since the last login
- Last-Sign In Location: Login location by country.
- Total Sign-Ins: Total logins by Status, Operating System, Browser, and Last-Sign In Location. For example, if you successfully logged in five times from the United States, using an Intel Mac operating system and a Chrome browser, this information is displayed on a single row with a Total Sign-Ins of five. If you unsuccessfully logged in three times with the same information, a new row is displayed with a Total Sign-Ins of three.
VeevaID self-registration logins are also captured on this tab. If you notice any unfamiliar login activity, you can use the Change Password tab to change your password.
Note: When your VeevaID user account details change, such as an update to Last Name, first initiate the update process in the VeevaID portal. Once updated in the portal, the new details are updated upon log in to a Vault or application. If you update your email address in the portal, it is updated before you log in to a Vault or application.
Updating Your Email Address
To update your email address:
- On the My Account page, click Emails.
- Click Edit.
- Enter your new email address.
- Click Verify. You may need to complete an image-based verification check at this point. An error occurs if the email address is not valid or is associated with another VeevaID user.
- If no errors occur, a verification email is sent to the new email address. Click the Click Here to Verify button in the verification email message. This link expires in ten minutes.
- A verification page opens and prompts you to enter your Current Email Address (your current VeevaID email address) and Password.
- Click Verify.
- If prompted for multi-factor authentication, a new page opens prompting you to enter a verification code sent to your current VeevaID email address. Enter the code on this page within ten minutes.
- Click Verify.
Your email address is now updated and you are directed to the My Account page. You can now use your new email address to log into VeevaID. If necessary, you can use the previous email address to register a new VeevaID user.
If the Click Here to Verify link or verification code expires, reinitiate the process by clicking Resend Verification Email on the Emails tab. You can also click Cancel the request to abort the process.
Note: Updates to your email address in the VeevaID portal automatically update your email address immediately in all Vaults where you hold a membership. This process ensures your user profiles, audit logs, and system notifications remain accurate without the need to wait to log in again.