Imagine that you’re about to board a plane and need to edit content in several different Vault documents. With Vault File Manager, you can use a bulk document action to check out the documents and download the source files to Vault File Manager on your Windows computer. You can also use the document Actions menu to check out individual documents to Vault File Manager. The installed client shows your list of checked out documents, which you can update even while you’re offline. When you’re back online, you can even use the client to check documents in without opening Vault.
If you have questions about Vault File Manager, see the Vault File Manager FAQ.
Note: We recommend that Windows users install Visual C++ Redistributable for Visual Studio 2015 to use Vault File Manager.
How to Install Vault File Manager
You can download the Vault File Manager installer from the User Profile page. The Download Installer link only appears if you access Vault from Windows. It cannot be accessed from Mac. Vault also prompts you to download the installer when you first use the Document Check Out bulk action. Follow these installation steps:
- Download the Setup.exe file and double-click to begin installation.
- Follow the instructions to review and accept the Vault File Manager License Agreement and NLog copyright notice.
- Enter your Vault login credentials when prompted.
Vault continues to prompt you to install Vault File Manager during the Document Check Out bulk action until you select the Don’t show again checkbox in the dialog.
To complete these steps, you must have the correct permissions and the Provision File Manager from Vault option must be enabled in your Vault. If the Provision File Manager from Vault option is not enabled in your Vault, contact your Admin.
How to Log In to Vault File Manager
Open Vault File Manager from the Windows application menu or desktop. Sign in to Vault File Manager with your Vault User Name. Vault directs you to log into your Vault using your Vault or VeevaID Password, or if your account uses Single Sign-On, you are automatically directed to your organization’s Identity Provider when you attempt to access Vault.
If the Vault File Manager client is already open but logged out, select Log In from the Actions menu. Vault File Manager autofills the User Name field based on your last login.
Checking Out Documents
To check out documents, you must log into Vault using your browser. You cannot check out documents from the Vault File Manager client.
Note: You must have the Application: Document: Vault File Manager permission to check out documents using Vault File Manager.
How to Check Out Individual Documents
To check out documents:
- Log into Vault using your browser.
- From the document Actions menu, choose Check Out to File Manager. If you are not already logged into Vault File Manager, Vault prompts you to open it.
Documents download automatically. Vault File Manager displays a progress bar that shows the document’s download status and automatically opens the file in the assigned application when the download is complete.
After editing a document, you must save it to the same location. Moving the file to another location will prevent Vault File Manager from checking in the document.
How to Bulk Check Out
To check out documents using the bulk action:
- Log into Vault using your browser.
- Select documents and choose Perform Bulk Action from the Actions menu. For details on document selection, see Using Bulk Document Actions.
- On the Choose Action page, select Document Check Out and click Next.
- On the Confirmation page, click Finish.
- Open the Vault File Manager client.
Documents download automatically. Progress bars show the download status for each document. Vault File Manager can download up to eight (8) documents at once. Additional documents in the queue show as “Pending download.” Hover over a document’s progress bar and click Skip File to place it at the end of the download queue or Cancel to cancel the checkout. Once the download is complete, open a document by double-clicking on the name from the document list, or right-click and select Open with to open the document in a different application.
Troubleshooting Document Download
If you don’t see your checked out documents in the client within a few sections:
- Check that you’re logged in with the correct user profile.
- Check that you have the correct Vault selected.
- Click the Refresh button.
- Check that you’re connected to the internet.
Checking In Documents
To check in documents from Vault File Manager when you’ve finished making changes:
- Open the Vault File Manager client.
- Use the checkboxes to select one or more documents for check-in.
- Click Check In.
- Optional: Add a comment in the Description field. This description applies to all documents selected for check-in.
- Click Check In.
Note: You must have the Application: Document: Vault File Manager permission to check in documents using Vault File Manager.
Vault File Manager uploads the new versions to your Vault and automatically deletes local files.
Progress bars show the upload status for each document. Hover over a document’s progress bar and click Skip File to place it at the end of the upload queue or Cancel to cancel the check in. Vault File Manager can upload up to eight (8) documents at once.
To check in documents from Vault when you’ve finished making changes, click the Actions menu on the Doc Info page and select Check In from Vault File Manager.
Note: Vault File Manager does not support file transfers from Shared Network Drives. As a best practice, we recommend against these transfers, as they will have varying rates of success.
Viewing Version Descriptions
To see the entered description in Vault, navigate to the checked-in document. Expand the Version History Doc Info fields panel and hover over the version number, or select Version History from the document Actions menu.
Checking in New Versions
If you want to check in a new file rather than checking in the version in Vault File Manager, first undo the checkout. The file remains in the Vault File Manager client, but you will not be able to check it in. For example, Gladys checks out a document via Vault File Manager, but then a coworker emails her an updated version of the document. The version in Vault File Manager is no longer the latest. Rather than checking in from Vault File Manager, she must undo the checkout and then use the Upload New Version action in Vault.
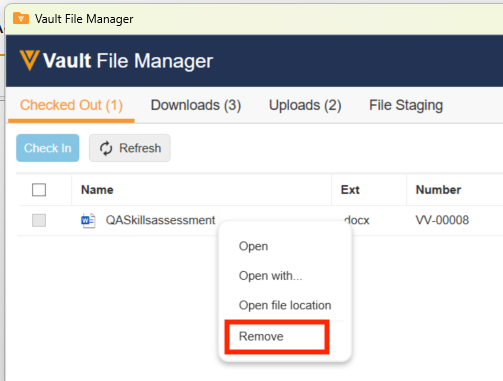
Undoing Checkouts
You can undo a file checkout either in Vault File Manager or directly in Vault.
To undo a checkout in Vault File Manager, right-click a single document and select Undo Checkout and Remove. This simultaneously removes the file from Vault File Manager and reverts the checkout in Vault.
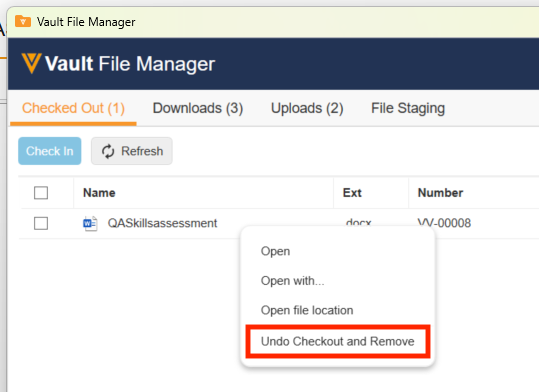
In the event that someone uses the Undo Checkout action from Vault on a document that is checked out to Vault File Manager, Vault File Manager does not automatically delete the checked out file. In this situation, right-click the file in Vault File Manager and select Remove to remove the file from Vault File Manager.
You cannot undo a checkout performed by another user unless you have the Edit Document role-based permission and either the Application: Document: Cancel Checkout permission or the Document Owner role on the document.
Working in Vault File Manager
Configuring Vault File Manager
See Configuring Vault File Manager.
Opening Documents
Open a document by double-clicking on the name from the document list, or right-click and select Open with to open the document in a different application.
Vault uses the VFM File Security Policy object to determine which file types Vault File Manager should open automatically. By default, VFM File Security Policy records auto-open most common file types. Admins can configure which file types automatically open.
Sorting Documents & Viewing Document Details
Click the column headers in Vault File Manager to sort documents by Name, File Extension, Document Number, Document Version, Document Type, File Size, Status, date the document was Checked Out, or date the document was Updated. The Updated column indicates the last time that you opened the file and saved it locally. Hover over a date in this column to see the full date and time.
If all file information doesn’t fit in the window, a scrollbar appears at the bottom of the client. You can also adjust column width to change how information displays. Text may wrap when you shrink column size.
Uploading Source Files
When you upload files above 4 GB in size, Vault prompts you to use Vault File Manager for improved speed and performance. You can upload source files up to 500 GB in size.
To upload source files using Vault File Manager:
- Select the Vault File Manager icon while creating a draft, uploading a new version, or uploading content to a placeholder. This option is unavailable on the standard Create Document page.
- Click Continue.
- In Vault File Manager, click Choose or drag and drop the file into the upload area.
- Click Start Upload.
You can monitor the upload using the Upload Status from the Uploads tab.
While processing an upload from Vault File Manager, Vault may temporarily display a Pending status and an empty document checksum and File Type. Vault updates the fields once the document is finishes processing. This is consistent with files processed from file staging. You can learn more about this process in the Developer Portal.
Downloading Source Files
When you download source files above 4 GB in size, Vault prompts you to use Vault File Manager. To download a source file using Vault File Manager, navigate to Source File in the Files panel on the Doc Info page and select Download to Vault File Manager from the Actions menu next to the file.
Uploading Rendition Files
To upload renditions to Vault using the Vault File Manager:
- In Vault, click Add Rendition on the Doc Info page.
- Select the rendition type.
- Click Upload using Vault File Manager.
- In Vault File Manager, select a file to upload.
- Click Start Upload.
- Double click the rendition item to view the document in your Vault.
When you upload rendition files above 1 GB in size, Vault prompts you to use Vault File Manager for improved speed and performance. Vault File Manager supports uploading rendition types (excluding Viewable Renditions) up to 500 GB in size; Viewable Renditions must be in PDF format and under 4 GB in size.
Downloading Rendition Files
To download any rendition using Vault File Manager, navigate to Renditions in the Files panel on the Doc Info page and select Download to Vault File Manager from the Actions menu next to the rendition.
When you download rendition files above 4 GB in size, Vault prompts you to use Vault File Manager for improved speed and performance.
Resuming Check Ins & Check Outs
If a check in or check out process is interrupted for any reason, such as a network outage, Vault File Manager updates the status to Check Out Interrupted or Check In Interrupted. To resume the process, right-click the file in Vault File Manager and select Retry.
Switching Between Vaults
If you have access to multiple Vaults with a single user profile, you can switch between them from the Vault Selector in Vault File Manager.
If you have multiple Vault accounts, you must use the Log Out option from the Actions menu in order to switch between accounts.
Event History
Select Event History from the Actions menu to see a log of events in the Vault File Manager client, including errors that occurred.
In-App Help & Feedback
Select Help from the Actions menu to open this page in Vault Help, or select Give Feedback to open the Veeva Support suggestions page where you can provide feedback on the application and suggest future enhancements.
Downloading Vault File Manager Logs
Before contacting Veeva Support while troubleshooting Vault File Manager, click the profile icon and select Save Log Files, then click Save (as zip file). These logs help Veeva Support during the troubleshooting process.
Accessing Your Vault’s File Staging in Vault File Manager
If you have the correct permissions, you can access your Vault’s file staging in Vault File Manager by clicking the File Staging tab. This tab displays your root folder in file staging and up to 1,000 items per page. Vault Owners can see root folders for all Vault users.
Uploading Documents & Folders
To upload documents to your file staging using Vault File Manager, click Upload and select File or Folder, then select the applicable files and click Open. You can also drag and drop documents or folders into the File Staging tab.
You can monitor the progress from the Uploads tab. This tab displays recent uploads, their Upload Status, and up to 1,000 items per page. If you upload a folder, the Uploads tab shows the upload progress of each file within the folder. Vault File Manager does not upload nested folders that are empty. Click Clear to clear the page of uploads in the Complete, Failed, Corrupted, File Not Found, and Cancelled statuses.
Downloading Documents & Folders
To download documents to your file staging using Vault File Manager, right-click on the document or folder and select Download. Select a download location in the dialog and click Save. You can monitor the progress from the Downloads tab. This tab also displays the progress of all files in a selected folder and its subfolders. Click Clear to clear the page of downloads in the Complete, Failed, Corrupted, File Not Found, and Cancelled statuses.
To download multiple documents, click the checkboxes next to the desired files and folders, then click the Bulk Actions menu and select Download. Indicate a download location in the dialog and click OK. You can monitor the progress of each document from the Downloads tab.
Note: If a file path is longer than the Windows maximum of 256 characters, Vault File Manager displays a tooltip stating that the file path limit was exceeded. This tooltip becomes visible when hovering on the status of the downloaded document or folder.
Managing Documents & Folders
To move a document in your using Vault File Manager, right-click on the document and click Move, then navigate to a new folder and click Move File to save your changes or Cancel to cancel the move.
You can also right-click on documents to copy the file path, rename, and delete files on file staging.
To manage folders on file staging, click the folder name in the breadcrumb and select New Folder, Rename, or Delete.
To move or delete multiple documents or folders, click the checkboxes next to the desired files, then click the Bulk Actions menu and select the action.
Reporting on Vault File Manager Users
When a user connects to a vault in Vault File Manager, the Vault File Manager User object creates or updates their record with the date they last connected and the version of Vault File Manager they used. Admins can see which users are using Vault File Manager by navigating to Business Admin > Objects > Vault File Manager Users. Admins can also create a custom report type for the Vault File Manager User object.
About Vault File Manager Statuses
The following statuses are possible:
| Status | Description |
|---|---|
| Preparing Check Out | The check out is initializing. |
| Check Out Pending | The document is pending checkout. |
| Checking File | Vault is validating the file. |
| Paused | The operation paused. |
| Check Out Canceled | The document check out was canceled. |
| Check Out Corrupted | The check out failed due to a corrupt file. |
| Check Out Interrupted | The check out was interrupted and has been paused. |
| File In Use | Vault File Manager cannot continue transferring the file as the file is in use by another application |
| Finalizing Check Out | The check out process is complete and Vault is validating the document. |
| New | The document download process is complete. |
| File Not Found | The document upload failed as a file could not be found. |
| Finalizing Check In | The upload has been sent to Vault and is being processed. |
| Not Checked Out | The document is no longer checked out. |
| Check In Pending | The check in process is pending. |
| Preparing Check In | The check in process is initializing. |
| Checked In | The document check in process is complete. |
| Check In Corrupted | The check in process failed due to a corrupted file. |
| Check In Interrupted | The check in was interrupted and has been paused. |
| Check In Failed | The document check in process failed. |
| Check In Complete | The document check in process is complete. |
| Check In Pending | The document is pending check in. |
| Checking In File | Vault File Manager is checking in a file. |
| Preparing Download | Vault is preparing the document download. |
| Download Canceled | The document download process was canceled. |
| Download Corrupted | The download failed due to a corrupted file. |
| Download Failed | The document download process failed. |
| Downloading | The document download process started. |
| Download Interrupted | The download was interrupted and is currently paused. |
| Download Pending | The document download process is pending. |
| Finalizing Download | The download is complete and Vault is validating the document. |
| Complete | The document download is complete. |
| Finalizing Upload | Vault received the upload and is currently processing it. |
| Preparing Upload | The upload process is initializing. |
| Opened | The document was opened. |
| Retrying | Vault is retrying the download after an interruption in the operation. |
| Undo Check Out Complete | The undo document check out process is complete. |
| Undo Check Out Failed | The undo document check out process failed. |
| Unknown Error | An unknown error occurred. |
| Upload Canceled | The document upload is canceled. |
| Uploading | The upload is in progress. |
| Upload Complete | The document upload process is complete. |
| Upload Corrupted | The upload failed due to a corrupted file. |
| Upload Failed | The upload failed and Vault cannot recover the document or retry the upload. |
| Upload In Progress | Vault is uploading the file. |
| Upload Interrupted | The upload was interrupted and is currently paused. |
| Upload Pending | The upload process is pending. |
Limitations
Vault File Manager has several limitations:
- Vault File Manager only supports Windows version 10 and later.
- Vault File Manager does not support localization.
- Vault File Manager requires a user’s Windows computer to have .NET Framework 4.8 or later. Users with operating systems older than Windows 10 may need to install or update .NET Framework.
- Vault File Manager does not auto-open all file types. For example, EXE files do not automatically run when checked out.
Related Permissions
The following permissions control actions related to Vault File Manager:
| Type | Permission Label | Controls |
|---|---|---|
| Security Profile | Application: Document: Vault File Manager | Ability to check documents in and out and download large rendition files using Vault File Manager. |
| Security Profile | Application: Document: Bulk Update | Ability to perform bulk actions. |
| Security Profile | Application: Document: Download Rendition | Ability to download large rendition files using Vault File Manager. |
| Security Profile | Application: File Staging: Access | Ability to connect to your Vault via Vault File Manager and to check documents in and out using Vault File Manager. |
| Security Profile | Application: File Staging: Access via Vault File Manager | Ability to access your Vault’s file staging via the File Staging tab in Vault File Manager. |
| Security Profile | Application: File Staging: Access Root Folder | Ability to access your Vault’s file staging server’s root folder. |
| Document Role | Edit Document | Ability to check out and check in the document. |